
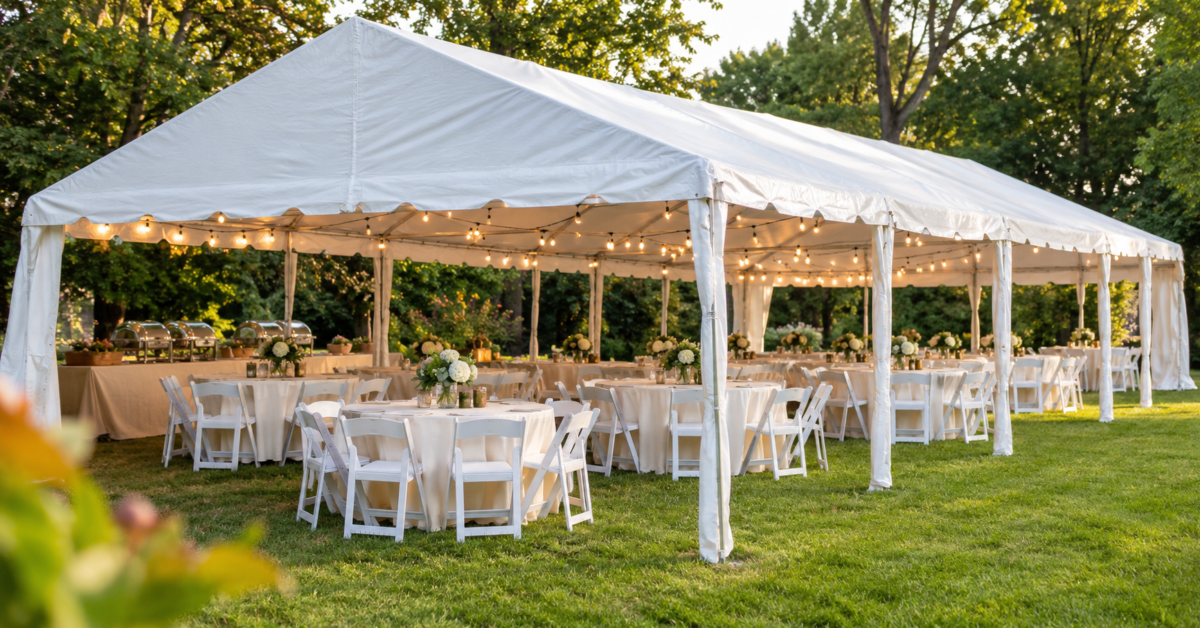
A 20×40 canopy tent covers 800 square feet, but seat count changes with furniture and occupied-chair clearances. Rental planning tables show eight 60-inch rounds seating 64, assuming a compact dining-only setup. A six-table banquet plan offers 48 seats with more room for guest movement and service. The most useful answer is a measured layout that preserves circulation, exits, and access.
Start by dividing the footprint into guest seating, circulation, and any staffed or equipment zones. Then test the layout against actual table dimensions rather than relying on a single capacity claim.
For a practical dinner, compare six eight-foot banquet tables seating 48 with eight 60-inch rounds seating 64. The larger round-table figure describes a compact supplier layout rather than a promise of generous aisles. Stage space, buffet queues, furniture movement, and local event requirements may reduce the final count.
This guide builds practical layouts for dining, weddings, presentations, classrooms, and buffet service. It distinguishes mathematical area estimates from seating counts published by tent rental businesses. Every suggested arrangement should be checked against the specific tent configuration and local event requirements.
Jump to a specific section on this article
Calculate Usable Seating Space in a 20×40 Canopy Tent
Multiplying the 20-foot width by the 40-foot length gives 800 square feet of roof coverage. That calculation describes the nominal footprint, not the floor remaining after equipment and clearance reservations. Draw the tent as a rectangle and mark each opening before placing furniture. When comparing alternative footprints, the canopy tent size chart helps translate dimensions into planning area.
A four-foot-wide circulation lane extending 40 feet occupies 160 square feet of the 800-square-foot footprint. Metro Tent Rental allocates 100 square feet for an eight-foot buffet station, including working space. After reserving both zones, 540 square feet remain before entrances, structural supports, and occupied chairs.
Measure from the actual usable edges rather than assuming the roof fabric defines every seating boundary. Sidewalls, tie-down points, and furniture overhangs can reduce the comfortable interior width. Uneven grass may make otherwise open corners unsuitable for occupied tables.
Mark the central aisle first if guests will move frequently between seating and service stations. Next reserve the door approaches and any required turning areas for mobility devices. Place tables only within the space left after those reservations. A Bosch BLAZE GLM165-25G 165-foot Green-Beam Laser Measure can check distances against fixed site features.
Treat the drawing as a measured concept that the installer can review, not an occupancy authorization. Verify the exact tent’s clear internal dimensions and support positions with its supplier. Revise the guest number whenever a new service area consumes floor space.
Estimate Seated Guest Capacity Under a 20×40 Canopy
Published seating charts use strikingly different assumptions for the same 800-square-foot tent. Metro Tent Rental lists 133 chair-only places, 96 banquet places, and 64 round-table places. Its figures describe an initial furniture fit, not necessarily a clear plan for service and accessible movement. For planning, distinguish those high-density examples from a layout with reserved aisles, equipment, and exits.
A workable banquet starting point is six eight-foot tables with eight guests each, yielding 48 seats. Six 60-inch rounds instead offer 48 dining places but require careful chair and aisle measurements. An 80-chair ceremony can be sketched as ten rows of eight, subject to exit and row-clearance approval.
These numbers are planning scenarios, not a code-approved maximum occupancy for every tent. A physically possible chair count may still fail exit or accessibility requirements. Check row widths, chair depths, entrance positions, and local occupancy decisions before inviting guests. For perspective, a 10×20 canopy seating layout demonstrates how furniture consumes a smaller roof footprint.
Write the table counts directly on the floor plan so organizers can check every estimate. Eight 60-inch rounds hold 64 chairs, while six eight-foot banquet tables hold 48 places at eight per table. Remove seats whenever the drawn aisles, buffet zone, or structural supports need more space.
Choose the final count by the most restrictive practical requirement, not the biggest promotional number. Comfort improves when guests can stand and depart without shifting neighboring tables.
Arrange Round Dining Tables Inside a 20×40 Canopy
Round tables support conversation, but chair movement can make a packed grid difficult to navigate. Metro Tent Rental’s 20×40 chart accommodates eight 60-inch tables seating eight guests each, totaling 64. Treat that as a dining-focused rental configuration and check actual clear routes before using every seat.
For a service-heavy reception, begin with three 60-inch rounds in one lengthwise row and 24 chairs. Allow about nine feet per occupied table footprint, including provisional chair projection beyond the five-foot top. Those three footprints use approximately 27 feet, leaving 13 feet of length to allocate. Reserve the open side for the buffet route and verify all entrance and turning clearances.
A 60-inch tabletop has a five-foot diameter before a seated guest pushes back a chair. Measuring table edges alone therefore overstates the clearance available between groups. Chair backs also shift during service, making the intended circulation width a moving constraint.
For a capacity-focused dinner, ask the rental company for its actual eight-round, 64-seat drawing. Measure the clearance between pushed-back chairs at adjacent tables, not only between tabletop edges. If a required central aisle is blocked, reduce the rounds or move service outside. A 64-seat package is useful only when its exact arrangement passes the site’s access and exit review.
An eight-table illustration is useful for discussion but should not be treated as universally workable. Set the guest target only after drawing the complete occupied footprint of every table.
Where space becomes tight, remove one table before narrowing a required access route.
Fit Long Banquet Tables Under a 20×40 Canopy Tent
Rectangular banquet tables create a predictable two-row floor plan when their chair positions are measured. Place three eight-foot tables end-to-end in each row for six tables and 48 seats. Both rows run 24 feet along the 40-foot tent length, leaving 16 feet for end zones. That count assumes eight side seats per table and no additional end chairs.
For a preliminary width check, assume tables are 30 inches wide and occupied chairs project two feet per side. Each table row then needs about six feet six inches across the tent’s 20-foot width. Two such rows and a four-foot center aisle consume 17 feet, leaving three feet near the edges.
That three-foot remainder is a narrow perimeter buffer, not a substitute for a legal side aisle. Because the example places 48 seats into two long runs, access depends on their end approaches. Obtain the local authority’s aisle and exit requirements before treating this furniture sketch as approved.
A higher-density version uses four eight-foot tables per row for 64 side seats. Those runs extend 32 feet, leaving eight feet combined at the tent’s short ends. Shorten the runs when a buffet, accessible turn, or staged presentation needs more length.
If the furniture plan exceeds the practical width, shorten the runs or divide the tables differently. Never borrow space from designated exits simply to preserve a headcount.
For 48 guests, six banquet tables in two 24-foot rows are a clearer starting diagram than ten crowded tables.
Design Wedding Reception Seating in a 20×40 Canopy
For 48 guests plus the couple, plan six eight-foot banquet tables and a separate sweetheart table. The two banquet runs use 24 feet of the tent’s length when joined end-to-end. Keep the head table out of circulation routes and measure its occupied chairs before finalizing the layout.
The banquet runs use 24 feet of length, so the remaining 16 feet must serve both short ends. Assign one end for the sweetheart table and photographs, and the other for entry circulation. Keep bar lines and dancing outside this dining-focused configuration unless the plan is redesigned. Check that all 50 seated places remain accessible after the couple’s table is positioned.
A modest head table can occupy part of one short end without bisecting circulation. A long head table may instead require sacrificing an entire guest-table position. Mark photographers’ likely routes so they do not permanently occupy narrow service aisles.
Plan a separate ceremony layout if the same canopy will host vows and dinner. A chair-only ceremony for 80 needs ten rows of eight in a measured design with clear exits. The banquet dinner for 50 including the couple requires a full furniture reset. Schedule enough staff time to keep the tent clear while those changes happen.
Verify placement of tent legs and any center poles before selecting a decorative focal point. Consider temporary sidewall use when planning guest visibility and access. Confirm every major furniture move with the installer and event coordinator.
Position Head Tables in a 20×40 Canopy Layout
A head table works best when guests can see the couple without turning away from the main circulation route. Position it against a short end only when that edge is clear of required openings. Leave a passage behind occupied seats if servers or photographers need access there. Keep any lighting cables beyond chair movement and foot traffic.
A small sweetheart table generally occupies less width than a full wedding party table.
Check the couple’s sightlines while standing at the planned guest table positions.
Avoid placing a speech microphone where it blocks the service lane. Move bulky decor away from chair pullback zones and entrance sightlines. Confirm the setup with the event team before final floor marking.
Plan Guest Table Spacing for Wedding Service
Wedding guests frequently stand for photographs, conversation, and trips to the buffet. Measure clearance with chairs occupied rather than tucked beneath the tables. A planned pathway should remain usable when nearby guests push their seats backward. Staff carrying trays may need more clearance than an empty-room diagram suggests.
Group tables by how guests will move, not merely by the seating chart’s numerical order. Keep family groups together without creating a bottleneck around the head table. Place accessible seating within the main guest area with equivalent visibility.
Map the route from every table to the entrance, food, restrooms, and exits. Keep chair backs from intruding into the route during ordinary movement. A diagram with generous margins is easier to adapt to unexpected furniture dimensions. Check temporary flooring for joints that could catch chair legs or mobility aids.
Seat guests needing frequent access nearer unobstructed passages when that suits their preferences. Brief the catering team on which lanes must remain open throughout dinner. Revise the plan if any route requires moving a seated guest’s chair.
Set Up Theater-Style Seating in a 20×40 Canopy
An 80-chair example can use ten rows of eight seats, divided into two blocks of four. With chairs assumed 20 inches wide, both four-seat blocks together occupy about thirteen feet four inches. Adding a four-foot center aisle brings this to seventeen feet four inches before any perimeter clearance.
Ten rows with an assumed three-foot pitch require roughly 30 feet of the 40-foot length. The remaining 10 feet must account for the speaker, entrance approaches, and any equipment. Validate chair pitch using the actual unfolded chair dimensions and the applicable fire requirements. If the routes or speaker area do not fit, remove rows instead of squeezing their spacing.
A 20-foot span may support several chair blocks, but never assume the central aisle is optional. Long continuous rows make late arrivals and emergency movement more difficult. Use the expected audience’s movement needs to choose spacing rather than maximizing every row.
The distinction between an open canopy and an enclosed event tent affects how entrances function. Review canopy versus tent differences when comparing sidewalls, opening arrangements, and shelter use. Place the presenter where no structural member blocks the primary line of sight. Leave speaker equipment outside designated paths so late arrivals can enter quietly.
Check that guests using mobility devices have suitable spaces with comparable views. Keep reserved seating dispersed as needed instead of isolating it in a back corner. Have the installer confirm the finished exits before attendees enter.
Plan Classroom Seating Under a 20×40 Canopy Tent
Classroom seating combines forward-facing tables with chairs, reducing capacity compared with chairs-only presentations. Allocate each participant a usable writing surface and enough room to rise without disrupting neighbors. The instructor’s display, demonstration table, and teaching aisle also consume floor area.
Start with short table rows facing the instructor along the 40-foot direction. Keep a passage between groups so participants can reach their places easily. Check glare and screen visibility from seats near open sidewalls. Remove the rear row if it prevents equipment or accessible circulation from fitting.
For workshops using laptops, plan electrical distribution before placing the tables. Power strips and cables should never cross walking routes without an approved protection arrangement. Check any service power with the venue and a qualified electrical professional.
As a first layout, six eight-foot training tables with four seats each provide 24 learning places. Place the six tables in a lengthwise sequence facing the instructor, with a continuous side passage. Each table requires space for chairs behind it, so measure all six row pitches before claiming 24. Reserve the remaining short-end zone for teaching and equipment.
Measure occupied chairs rather than empty table footprints when testing classroom rows. A smaller classroom group often produces substantially better participation and access.
Reserve Buffet Space Without Crowding a 20×40 Canopy
Buffets require more floor space than their serving tables suggest because diners stand in moving queues. Reserve room for the serving line, staff access, and people walking around the queue. Food-service placement should be decided before filling the tent with dining furniture.
For a 48-seat banquet dinner, the two three-table runs already occupy 24 feet of tent length. Metro Tent Rental budgets about 100 square feet for one eight-foot buffet table and its operating zone. Mark that entire zone in the remaining 16-foot length before placing drink stations. If guests would queue across the aisle or entrance, move the buffet outside or reduce dining tables.
Separate beverage service from the main food line when space permits. A drink station near the exit can create congestion during arrivals and departures. Staff restocking routes must remain open behind or beside the serving tables.
A Komelon SL2825 Self Lock 25-Foot Power Tape can help check distances between tables and planned queue boundaries. Its 25-foot steel blade is useful across the tent’s shorter 20-foot dimension. Mark the actual floor position of each station before setting down rental furniture.
If a buffet shares the tent with dancing, move one activity outside when practical. That choice protects both circulation and the quality of the event experience.
Adjust 20×40 Canopy Seating Around Center Poles
Not every 20×40 event shelter has the same structural layout or clear interior span. Many frame tents provide open floor space, while pole-supported designs may have interior supports. Ask for the actual leg and center-pole diagram before drafting a detailed seating map. Never assume a support can be removed to make room for another table.
A center pole can interrupt an aisle, a table location, or the sightline to a speaker. Route circulation around it with enough clearance for actual guest movement. Avoid creating an isolated pocket of seats with a single narrow way out.
If the shelter uses tensioned fabric, guy lines may occupy substantial space outside the roof footprint. Those external hazards must be included in the site plan even when they do not reduce dining area. Understanding canopy frame and cover components helps distinguish roof coverage from structural clearance. Confirm the chosen model’s anchoring requirements directly with its installer.
Move tables or the presentation area rather than adjusting structural parts for convenience. Reflect each fixed obstruction on the printed layout given to catering and event staff. Inspect the final setup before chairs are brought inside.
For an obstructed 20-foot span, parallel banquet runs may need to be shortened. A clear-span frame tent may offer more furniture flexibility but still requires safe anchoring. Choose the seating concept around the actual structure, not an idealized rectangle.
Check Walkways and Exit Clearances in a 20×40 Canopy
A seating plan is incomplete until every occupied position has an unobstructed route toward an exit. Check entrances, emergency exits, tent legs, furniture, and service stations as one circulation system. Aisle dimensions must match the applicable authority’s requirements for the specific event. Do not derive legal occupancy from area alone or from a rental supplier’s seating chart.
For accessible pedestrian routes, 36 inches of clear width is a key federal design benchmark. Large turning movements may require substantially more open space than a straight walking lane. Keep temporary mats, chair legs, and extension cords from compromising the route.
Review the location of exits with the tent provider and local fire authority. A high guest count may require additional exits or different aisle arrangements. Include any temporary sidewall configuration in that discussion rather than assuming openings stay unchanged.
The complete canopy tent planning guide covers setup decisions that influence the usable event site. Cross-check the seating diagram against installation, weather, and anchoring constraints before approving it. Arrange for the seating count to be checked after furniture placement.
Keep a printed version of the approved plan available for setup staff and the event lead. Walk every route with the chairs in their occupied positions, not merely stacked. If an aisle becomes restricted, move furniture rather than asking guests to squeeze past. Recheck circulation whenever the buffet, stage, or audio equipment changes position.
Final capacity should reflect actual clearances, usable furniture arrangement, and the event authority’s conditions.
Frequently Asked Questions about a 20×40 Canopy Tent
How many standing guests can a 20×40 canopy tent hold?
For a standing reception, 80 to 100 guests is a planning scenario for an 800-square-foot roof. Metro Tent Rental uses six to ten square feet per standing guest before other event features. The more generous end of that allowance supports movement better than the densest estimate. Subtract any bar, buffet, or DJ zones before checking the approved occupancy and egress plan.
Standing guests move unpredictably, so queues and beverage stations can create sudden bottlenecks. Reserve a central circulation route before arranging high-top tables or display stands. Count the bar, music area, and coat storage as occupied floor space.
A dense crowd may feel uncomfortable even when the raw area suggests adequate room. Plan for guests arriving and departing in groups rather than in a steady stream. Adjust attendance downward if the event includes frequent movement between activity stations.
Can a 20×40 canopy fit a dance floor and dining tables?
Yes, an 800-square-foot tent can hold dinner tables and a small dance floor when the layout is deliberately limited. Four eight-foot banquet tables seat 32 guests when each has eight side chairs. A 12-foot-by-12-foot dance floor occupies 144 square feet before speaker and DJ equipment. Draw a separate zone for the sound setup, then trace routes from tables to exits. If the dining chairs or dancing crowd cross those routes, shift one activity outside.
What size stage can fit beneath a 20×40 canopy tent?
A small stage can fit beneath some 20×40 tents when the setup permits adequate height and clearance. A stage measuring eight feet by eight feet consumes 64 square feet before access and equipment. Its practical suitability depends on roof height, structural supports, and loading arrangements. Ask the staging contractor for a stage plan approved for the specific tent.
Provide safe performer access without crossing the audience’s only circulation route. Keep speaker stands, cables, and backstage storage outside designated exits. Confirm any overhead equipment with the tent supplier before installation.
How much extra ground space is needed to anchor a 20×40 canopy?
The required space extends beyond the 20-by-40-foot roof when stakes or guy lines project outward. There is no reliable single perimeter allowance for every tent design. Ask the manufacturer or qualified installer for the exact anchoring footprint and clearances. Reserve those external areas on the site map before placing neighboring tents or walkways.
Stake positions and line angles depend on the particular certified system and site conditions. Underground services must be located before ground penetration where applicable. Keep guy lines away from public routes and provide barriers where required.
A frame tent using engineered ballast may need a different ground arrangement than a pole tent. Do not replace prescribed anchors with improvised household weights. Obtain the installer’s approved anchoring plan rather than estimating restraint from guest count.
Can a 20×40 canopy tent be installed on a sloping lawn?
A gently uneven lawn may be usable when a professional installer approves the site and support arrangement. Significant slopes can complicate anchoring, chair stability, drainage, and accessible circulation. Check the ground at several points rather than assuming one flat patch represents the entire footprint. A Klein Tools ACCU-BEND 935AB4V 4-Vial Level can reveal local tilt on a straight board. That small tool does not replace a professional site-grade or structural assessment.
Use a suitable stable surface for guest seating instead of balancing chairs on loose shims. Accessible routes need particular attention to running slope, cross slope, and surface firmness. If the installer rejects the lawn, choose another site or an engineered leveling solution.
What flooring keeps dining chairs stable under a 20×40 canopy?
A firm, level, slip-resistant event floor generally provides more dependable chair support than soft ground. Choose flooring panels designed for the actual chair loads and site conditions. Verify that panel joints and edges will not trap narrow chair legs or mobility devices. The installer should specify whether a subfloor or ground preparation is necessary.
Plastic mats, modular flooring, and rigid platforms perform differently on wet or uneven surfaces. Ask for the system’s installation instructions and permitted loading conditions. Keep threshold transitions smooth where guests enter or leave the tent.
Test a fully occupied chair at several points after the floor is installed. Look for rocking, panel deflection, and uneven joints rather than judging by appearance. Make sure spills can be addressed without creating slippery passageways.
Replace unstable flooring sections before guests begin using the seating area.
Can two 20×40 canopy tents connect for a larger gathering?
Two 20×40 tents can sometimes form a larger event area using a connection approved for both systems. Their combined nominal roof coverage would be 1,600 square feet before overlap or connector details. Joining the structures changes drainage, wind behavior, anchoring, and potentially permit conditions. Have the supplier design and install the connection rather than improvising gutters or straps.
What permits are required for a 20×40 canopy tent event?
Contact the local building or fire authority before installing an 800-square-foot event tent. Permit thresholds differ by jurisdiction, sidewall configuration, site, and intended use. Some codes regulate large temporary tents through operational permits, installation approvals, or both. Ask about occupant load, exits, flame resistance, anchoring, inspections, and the installation period.
Submit the proposed seating layout and tent specifications when the authority requests them. Outdoor assemblies may require additional permissions unrelated to the tent’s dimensions. Do not assume that renting the structure automatically satisfies the event’s legal obligations.
How can a 20×40 canopy accommodate guests using wheelchairs?
Provide accessible routes to seating, services, entrances, and exits without isolating guests using mobility devices. The federal Access Board’s accessible route standards generally specify a 36-inch minimum clear walking width. Turning areas and particular route configurations can require greater space. Apply the relevant accessibility requirements to the actual event and venue.
Keep wheelchair spaces integrated among comparable guest seating positions with suitable sightlines. Make neighboring companion seating available when required and practical. Avoid routes crossing soft turf, exposed cables, or unstable floor transitions.
Measure the path after tables and chairs are fully arranged. Provide sufficient maneuvering space at buffet stations and accessible restrooms. Ask the event coordinator to test the entire guest journey before opening.
How should electrical cables be routed inside a 20×40 canopy?
Route electrical cables away from aisles and exits whenever the site layout allows. Use equipment and weather protection appropriate for temporary outdoor electrical installations. A qualified electrician should determine distribution capacity, grounding, and required protective devices. Coordinate cable paths before placing staging, buffet equipment, or floor panels.
Where a crossing is unavoidable, use a properly rated cable protection system approved for the event. Keep connectors out of standing water and away from damage by moving furniture. Do not conceal potentially damaged cables beneath loose rugs or taped fabric.
Separate public pathways from behind-the-scenes power distribution where practical. Confirm that accessible routes remain smooth and usable over any approved crossing. Review all cable connections when the final room layout changes.
Remove damaged equipment from service instead of trying a temporary patch during the event.
What to Remember About a 20×40 Canopy Tent
A 20×40 canopy tent provides 800 square feet, but seating changes with table type and service needs. For a clear starting plan, use six eight-foot banquet tables for 48 people in two 24-foot runs. Eight 60-inch rounds can seat 64 in a supplier’s compact dining layout, but measure occupied-chair clearances. An 80-seat presentation requires a separate row and aisle plan, not the banquet drawing. Have the installer and event authority verify exits, anchoring, accessibility, and final occupancy before inviting guests.