
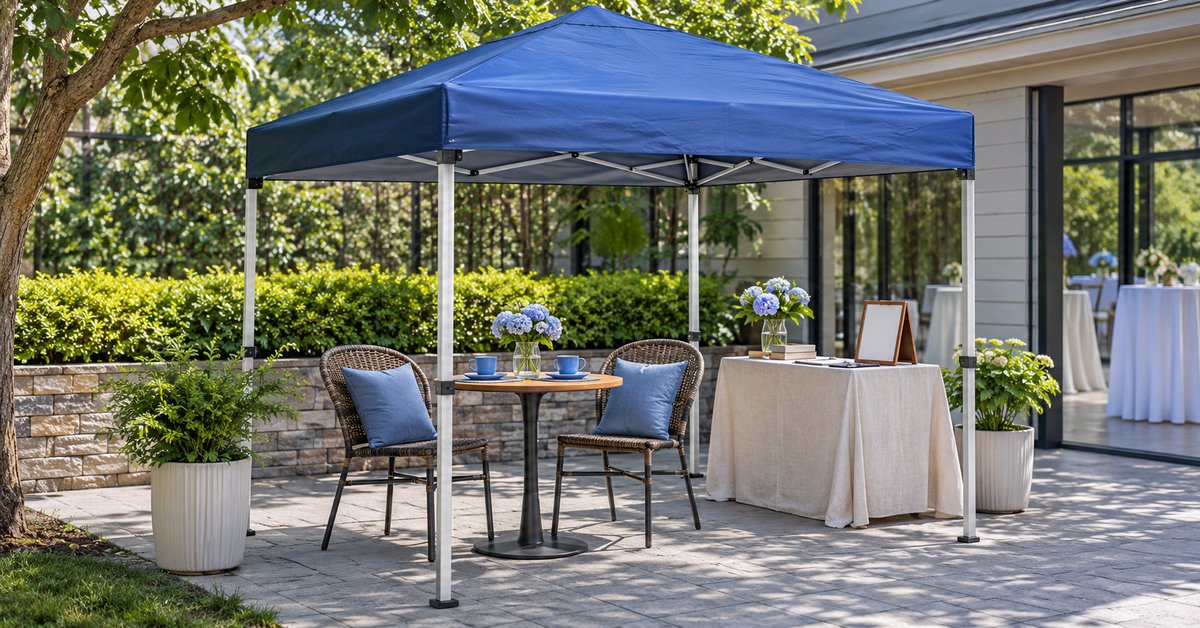
An 8×8 canopy tent covers 64 square feet, but its best uses depend on more than roof size. A two-seat patio table, small craft booth, or single-counter event station fits the format especially well. The compact roof is less suited to crowded demonstrations, full buffets, or several competing activities. Start with the one task the shelter must support, then measure every object needed for it.
For most users, the strongest arrangements are two-person dining, front-facing merchandise displays, and simple check-in points. A four-chair lounge or large demonstration can quickly exhaust the room needed for comfortable circulation.
Patio owners should check chair pullback and late-afternoon shade before settling on furniture. Vendors need a service edge that people can approach without squeezing between stock and support legs. Event planners should keep queues and waiting areas outside the covered working zone.
The layouts below use an eight-foot planning square to illustrate clearances with measurable examples. Actual canopy leg spacing, roof overhangs, and required anchors can change those figures. Treat each arrangement as a starting sketch and verify it against the selected frame and venue.
Jump to a specific section on this article
Measure Patio and Event Space for an 8×8 Canopy Tent
A nominal 8×8 roof provides a 96-by-96-inch planning square, equal to 64 square feet of overhead coverage. Mark the actual canopy leg positions because roof overhangs and frame spacing may differ. Outline tables, chairs, signs, and shelves using their measured dimensions instead of estimating by appearance. Add a separate boundary for ballast and guy lines, which may extend beyond the roof edge.
Measure pathways beyond the frame because guests must reach shelter without stepping over ballast or cables. For a narrow patio, identify a clear approach along one side rather than forcing access through furniture. Compare these dimensions with the canopy size chart before choosing a larger shelter for crowded gatherings.
Walk the proposed layout at the same time of day you expect to use it. An overhead roof may block midday sun while low afternoon sunlight reaches a seated guest directly. Mark where shadows fall on the table, display surface, and approach path before choosing the final orientation.
Mark where each weight or stake would go before arranging chairs or display racks. On concrete, use a ballast method approved for the actual canopy and surface. Do not assume a patio railing or furniture can replace the anchoring instructions supplied with the frame. Reserve additional clear space where guy lines extend beyond the tent’s nominal footprint.
A 24-inch-deep rear table leaves 72 inches of nominal depth within a 96-inch planning square. That is not a measured walkway because table legs, frame posts, and people also occupy space. Recheck the remaining path with furniture deployed and every ballast bag in place.
Shade a Small Patio Dining Set With an 8×8 Canopy
For patio dining, the strongest fit is a two-seat bistro arrangement rather than a full family table. A centered 30-inch round tabletop leaves 33 inches to each edge of a hypothetical 96-inch square. That dimension must still accommodate chairs, frame posts, and somebody getting up. Offset the table toward one side when the opposite side needs a clearer entry.
Four compact chairs may fit, but pulled-out seats can consume the remaining walking space. Measure each occupied chair from the table edge to the backrest before accepting four seats. Keep coolers and serving carts outside the dining zone rather than using the last open corner.
A centered 24-by-48-inch table leaves 36 inches on two sides and 24 inches on the other two. Those edge-to-table distances are not accessible aisle widths or finished chair clearances. An occupied chair can use most of a 24-inch gap before anybody tries to pass. Try two chairs first and add seats only after testing the full arrangement.
Think about the basic canopy structure when positioning furniture near corner posts and fabric edges. Do not let hot cooking equipment touch the roof or sit beneath it against manufacturer restrictions. Set grills and open flames away from the canopy according to equipment directions and local rules.
A two-person table with a compact serving surface usually makes better use of this limited roof. For four diners plus a buffet, choose a larger shelter instead of combining both functions under eight feet.
Create a Cozy Patio Lounge Under an 8×8 Canopy
An 8×8 lounge works best as a two-chair conversation nook, not a complete outdoor living room. Angle the chairs toward a small shared table while keeping the front entry open. Leave plant pots and storage baskets beyond their legroom so guests can sit without shifting furniture.
If you choose a 48-inch loveseat, mark its full depth as well as its width before positioning it. A centered 48-inch piece leaves 24 inches of nominal width on either side before counting posts. That configuration favors a front entry because walking around both loveseat ends may be impractical. Choose separate chairs when people need to pass through the covered area.
Sun movement can change a comfortable morning retreat into an exposed afternoon sitting area. Place the open seating face away from the strongest low-angle sunshine when possible. A manufacturer-approved side panel may help, provided it does not obstruct the exit.
Plan for a drink surface, a dry bag for cushions, and a path around furniture. Choose battery lighting designed for outdoor conditions instead of trailing household extension cords across the floor. Keep decorations detachable so the entire setup can be cleared quickly when weather changes. Use the lounge during a calm afternoon first to evaluate reach, glare, and comfort.
For a more relaxing result, keep one small table and remove any secondary storage rack. Leave one sightline open and check whether approved side shade would reduce too much airflow.
The best lounge arrangement gives occupants room to enter and turn without moving a chair.
Set Up an 8×8 Canopy Craft Market Booth
The best vendor fit is a front-service craft stall whose customers browse from the market aisle. A 48-inch tabletop can present a focused product collection without filling the entire shelter. Keep wrapping materials and replenishment stock behind the seller in labeled containers. Before booking, confirm the organizer accepts an eight-foot booth instead of requiring a standard ten-foot pitch.
Try one 24-inch-deep rear counter and let customers browse from the open front. The counter leaves 72 inches of nominal depth before accounting for posts, the seller, and storage. Add one rear display rack rather than several competing shelves along both sides.
Markets often use a standard 10×10 vendor pitch, so an eight-foot frame warrants advance organizer approval. For an allocated eight-foot pitch, check whether weights, signage, and fixtures must also remain within it. Keep the browsing line inside permitted event boundaries rather than borrowing space from neighboring vendors.
Use display risers only when they remain steady on the actual ground surface. Keep merchandise below the canopy’s valance so it is not exposed to unnecessary dripping. Prioritize one strong product category over a crowded assortment of unrelated items.
Leave clear space for the seller to reach each display without climbing around stacked inventory. Provide an obvious entry and avoid placing the checkout station directly in its path.
A booth that supports conversation and movement usually sells its story more clearly than a packed display.
Position Craft Displays Along 8×8 Canopy Walls
In a sample layout, an 18-inch-deep rear rack leaves 78 inches of nominal front-to-back space. A second side rack can narrow the approach and trap shoppers near a rear corner. Display fragile ceramics at a stable, reachable height rather than above customers’ heads. Keep shelves freestanding and secure them according to their own instructions, not the canopy trusses.
Measure shelf depth including any hooks or product hangers projecting toward customers.
Secure freestanding racks independently rather than relying on the canopy frame as their support.
Present the main product selection near the shelf front so shoppers do not reach deeply across breakables. Position concise labels beside each group to reduce unnecessary handling during busy periods. Photograph the measured setup and reuse those dimensions when rebuilding the booth at another event.
Keep Customer Access Clear in an 8×8 Booth
Browsing from the front generally works better than inviting several shoppers inside a narrow 8×8 booth. Place one seller behind the counter and reserve a side margin for packing supplies. Locate a second team member outside the working zone if the organizer permits it. Direct demonstration audiences away from the entrance and the neighboring vendor’s aisle.
Where applicable, an accessible walking route generally needs 36 inches of clear width, with additional maneuvering space for turns. That clear route cannot include ballast bags, cords, tripod feet, or loose inventory. Check counter reach and turning space separately because an open straight path alone is insufficient.
Keep the payment device within reach of staff without forcing guests through stock storage. Place small purchases in bags at a separate packing point when space allows. Remove a side display if visitors routinely have to move sideways to pass. For popular demonstrations, shift the audience outside the tent while respecting event boundaries.
Observe how people approach the booth before moving any signs or displays during trading. When queues grow, use a single clear service point instead of a second improvised checkout. The vendor should retain an unobstructed view of the public aisle throughout operation.
Display Plants at an 8×8 Canopy Garden Stall
An 8×8 garden stall suits seedlings, herb trays, and a few small potted displays. Choose one slim shelving line instead of filling three sides with plant racks. Place tall specimens toward the rear so they do not hide smaller labels or block customer access.
On a sample 96-inch planning square, an 18-inch-deep rear bench leaves 78 inches in front. Add a separate work surface only if circulation remains adequate after accounting for legs and containers. Group shade-sensitive seedlings away from afternoon sun that enters through the open sides. Keep waterproof trays and a spill kit close because wet flooring can disrupt narrow stalls.
Plant tables should remain shallow enough for buyers to inspect labels without leaning dangerously across them. Avoid hanging heavy baskets from the canopy truss without written manufacturer approval. A slim service space behind the display allows staff to retrieve stock without entering the public aisle.
Use simple signs to distinguish varieties and any specific handling or planting needs. Keep extra trays packed securely so a gust cannot turn empty containers into airborne debris. Maintain airflow around foliage even when the canopy protects it from direct midday sunshine. Position watering supplies outside the main route and wipe spills promptly.
A sample plant arrangement near the entrance can explain the stall’s theme immediately. Move fragile stems away from the edge where shoppers may catch them with bags. At closing, pack sensitive plants before dismantling the canopy so the workspace stays manageable.
Create an 8×8 Canopy Booth for Product Demonstrations
The strongest 8×8 demonstration involves one action that viewers can watch from outside the roof. A craft technique or compact product demonstration needs only one controlled work surface. Keep the presenter inside while directing spectators away from the event’s designated walking aisle.
Draw a 48-by-24-inch demonstration bench on the floor plan and add a separate presenter zone. Position materials to one side so staff can reach them without turning away from visitors. For small details, consider a permitted display screen instead of packing additional spectators beneath the roof. Check venue rules before bringing electrical equipment, heat, aerosols, or amplified sound.
Present the object at a comfortable height without piling packages across the demonstration surface. Keep written instructions or a small sign within easy view of people standing nearby. Allow the presenter to reach safety controls without stepping around an audience.
A craft tutorial can use one workbench and a small sample display instead of several tables. A gardening demonstration might use shallow trays and a separate covered bin for waste. For mechanical demonstrations, check noise, ventilation, and prohibited activities with the venue first. Avoid heat sources beneath fabric roofing unless the product and event rules expressly allow that use.
Choose a tent with suitable setup and anchoring instructions for the actual event surface. A canopy model’s advertised coverage tells little about its usable clearances or permitted hanging loads. Demonstration quality improves when every tool has an assigned position and an uncluttered working path.
Use an 8×8 Canopy as an Event Registration Station
An 8×8 registration station works best for one check-in queue rather than several simultaneous lines. Place one 48-inch service table at the back with clipboards or a single scanner. Let visitors approach from outside the roof while the center remains available for staff movement.
Organize forms in arrival order so attendants do not need to reach across one another. Assign a second helper to direct traffic before guests reach the counter when staffing allows. Set any freestanding welcome sign outside the accessible route, not between table and entry. Identify a dry alternate location for guest lists and electronics before people arrive.
A printed backup list keeps check-in moving if an electronic device becomes unusable. Keep screens shaded without sealing off airflow around electronics. Place a secure container for confidential paperwork out of public reach.
Registration needs also connect to the broader canopy planning guide when selecting a frame and ground anchoring method. Measure the queue outside the roof rather than counting waiting guests as occupants under it. Use clear floor markings or freestanding signs only where the site permits them. Have a plan to relocate registration indoors when unsafe weather approaches.
When visitors can approach, register, and depart without crossing paths, the small station functions efficiently. Leave the canopy’s rear area available for staff movement instead of creating another informal queue.
Set Up a Backyard Refreshment Bar Under an 8×8 Canopy
An 8×8 refreshment bar works best as a single-sided drinks station rather than a full buffet. A 48-inch counter can support a compact drink setup without occupying the entire roof width. Keep bulk ice and refills behind the counter or in an approved adjacent service area.
Choose a queue that approaches the counter from one side and leaves by the other. Put napkins and covered waste containers beyond the roof edge without obstructing circulation. Use sealed dispensers on stable tables and place drip trays beneath their taps. Move cooking equipment away from the canopy fabric according to its operating instructions.
A simple single-line service layout makes it easier to see who is waiting. Arrange napkins and waste containers just outside the serving space when site rules allow. Keep the entry clear so staff can carry restocking supplies without squeezing past guests.
For a family gathering, a self-service station may require fewer attendants than a staffed bar. Provide enough nearby standing room that guests do not linger beneath the roof while deciding. Never place grills or flame-producing appliances beneath the fabric unless their instructions explicitly permit it.
Set up the bar with empty containers first to check reach and stability. During service, remove spills promptly so the compact floor area stays safe.
Provide Event Staff Shade With an 8×8 Canopy Tent
An 8×8 staff station is effective for radio coordination and brief, staggered rest periods. Set one narrow counter at the back with a seating corner away from the entry. The station is too small for a full crew briefing and equipment storage at once. Hold group briefings outside the frame or use another suitable venue room.
A back table can hold supplies while the front stays open for quick exchanges. Avoid placing the station where service vehicles must pass close to the frame. Keep radios and charging devices protected from moisture according to their operating instructions.
For each shift change, keep emergency contacts and assignments in a clearly marked binder. Arrange spare radios and batteries by function instead of mixing them in one supply box. A small whiteboard can display responsibilities without taking over the entire work surface. Keep drinking water accessible without forcing staff to stand in the entry.
For outdoor events, the National Weather Service outdoor-event guidance supports planning for weather monitoring and safe relocation. Do not treat fabric canopies as lightning shelters, even when they have metal frames. Assign one person to monitor changing weather and communicate stop-work decisions.
Protect staff movement by positioning weights away from entrances and marking unavoidable ground obstacles. Check the roof and frame periodically for loosening attachments or pooling water. Remove the canopy from use when conditions exceed the manufacturer’s limits or the event’s emergency plan.
Adapt an 8×8 Canopy for Small Community Events
The most useful community applications are information desks, seed exchanges, and single-table repair demonstrations. Each needs one service surface and an obvious visitor approach from outside the roof. Choose an activity that serves people at the canopy edge rather than gathering everyone inside. Queue space and accessible circulation must extend beyond the eight-foot coverage area.
For a plant swap, sort items by category and leave the actual exchange near the front. A repair meetup may need a single work surface, secure tool storage, and designated waiting space. At a school fair, keep materials at reachable heights and provide clear supervision lines.
Accessibility should shape the arrangement from the beginning rather than after equipment arrives. Check the approach surface, usable entry width, and turning space against applicable event requirements. If a wheelchair user cannot reach the service point, redesign the arrangement rather than relocating the person.
For an information booth, put printed schedules on one board beside the service counter. For a seed swap, separate donated packets from collected ones using clearly labeled boxes. For a repair clinic, keep waiting visitors beyond the tool area and away from moving equipment.
Where an activity requires several tables or lines, the longer canopy layout may offer a more workable alternative. Two separate small canopies can also define different functions when the venue permits adequate spacing. Measure their combined anchoring zones rather than adding only the nominal roof dimensions. Do not assume adjacent roofs can safely be tied together without manufacturer-approved hardware.
A successful small event station keeps its main purpose visible and its walking routes unobstructed.
Frequently Asked Questions about an 8×8 Canopy Tent
How many people can comfortably sit under an 8×8 canopy tent?
For two-person dining, an eight-foot square roof usually offers the least cramped arrangement. Four small chairs may fit around a compact table, but pulling them back can consume the remaining space. A nominal 64-square-foot roof should not be treated as 64 square feet of unobstructed seating area. Test the arrangement with every chair occupied before planning it for four guests.
For a two-seat bistro, measure the chair backs with diners actually seated. Keep serving items on a small side table only if the entry remains open. With four chairs, move coolers and spare equipment completely outside the canopy.
Count occupied chairs only after checking the walkway created by the arrangement. Venue occupancy limits and accessible circulation rules may require more space than a home patio needs. Choose a larger shelter when guests repeatedly have to shift furniture to move.
Can an 8×8 canopy tent fit on a narrow apartment patio?
An 8×8 canopy can fit only when the patio provides enough clear area for its actual frame and anchors. Measure the usable width at floor level, not just the widest distance between walls. Check balcony rules, overhead obstructions, drainage, and permissible methods of securing outdoor structures. A roof overhang or railing can reduce working clearance even if the nominal frame fits. Do not install a freestanding canopy on an elevated balcony without authorization and an approved safety plan.
How does an 8×8 canopy compare with a 10×10 canopy for vendors?
An 8×8 roof covers 64 square feet, compared with 100 square feet under a nominal 10×10 roof. The larger size provides 36 additional square feet, or 56.25 percent more nominal area. That extra room can accommodate back stock, a second seller, or a customer approach space. Choose the smaller frame for front-only browsing when the organizer permits an eight-foot pitch.
Many events standardize booth pitches, so confirm whether the organizer accepts an eight-foot frame. Compare the booth layout under both sizes before selecting shelving, tables, or signage. The larger size can create a more comfortable staff zone when two sellers work together.
How much extra ground space do 8×8 canopy anchors require?
Allow space beyond the eight-foot square whenever the specified anchoring method extends outside the legs. The amount varies with stake angles, guy lines, weight bags, and the particular canopy design. Measure each chosen anchor after following the exact manufacturer’s installation instructions. Never assume a neighboring vendor’s allocated pitch can accommodate your stakes or weights.
At a market, sketch the roof and the surrounding anchoring zones separately. Ask organizers whether guy lines can cross walkways or neighboring plots. Choose an approved compact ballast arrangement when extending ropes is not permitted.
An open lawn may allow stakes where a concrete courtyard cannot. Hard surfaces require a compatible weighting system rather than improvised stakes or unsecured containers. Check anchors before opening and again after changes in weather or ground conditions.
Can an 8×8 canopy tent be safely installed on concrete?
Yes, when the specific canopy permits hard-surface installation with a correctly sized anchoring system. Concrete does not accept ordinary ground stakes, so approved ballast or engineered attachments are essential. Follow the manufacturer’s requirements for weight placement and frame attachment instead of estimating loads yourself. Confirm that the venue permits the proposed method before setting anything on its pavement. Never drill into shared or public concrete without the property owner’s written permission.
Keep ballast out of accessible pathways and make any unavoidable obstacle visible. Do not tie the frame to a railing, signpost, or parked vehicle without explicit approval. If reliable anchoring cannot be achieved, do not erect the canopy at that site.
What size folding tables fit inside an 8×8 canopy tent?
A 48-by-24-inch folding table is a useful starting size for a compact service counter. Centered within a 96-inch planning square, it leaves 24 inches at each end and 36 inches front and back. Those geometric gaps are not usable aisles once chairs, frame legs, and anchors are added. A six-foot table may fit along one edge but can restrict storage access and movement.
Position a longer table along one side instead of cutting across the center. Keep the busiest service edge facing the entry when customers need to reach supplies. Measure the remaining walking path at its narrowest point rather than estimating from the roof width.
A narrow table provides greater circulation space than a deeper one of the same length. Test seating with the chairs fully extended and consider how staff will turn with supplies. If two tables create a bottleneck, replace one with low storage outside the main area.
The useful table size is the one that leaves a safe, clear movement route.
Are 8×8 canopy sidewalls practical for small outdoor booths?
Sidewalls can help an 8×8 booth protect back stock and define a private working edge. However, panels can narrow openings, restrict airflow, and increase the shelter’s exposure to wind forces. Confirm that each wall matches the exact frame series, mounting system, and canopy height. Keep the front open for customer access and follow the manufacturer’s anchoring instructions.
How can I keep an 8×8 canopy cool during summer events?
Keep at least one side open for airflow and position the station to reduce direct afternoon sun. Lightweight furnishings and a clear interior help reduce crowding around people and equipment. Move drinking water to a reachable place without placing containers across exits. Watch heat conditions closely, particularly for children, older guests, and workers performing physical tasks.
Shade reduces direct solar exposure but does not remove dangerous ambient heat. Choose rest breaks and indoor cooling options appropriate to the forecast and activity. Do not block the remaining airflow with tightly arranged stock or solid display boards.
Can an 8×8 canopy tent accommodate wheelchair access?
An 8×8 canopy can support an accessible edge-service station when the entire approach stays unobstructed. Plan a 36-inch clear walking route wherever the applicable accessibility standards require that width. Turning a wheelchair may require additional maneuvering space beyond the route’s straight-line width. Position the service counter near an open edge rather than forcing guests through crowded displays.
Measure the visitor approach with ballast, table legs, and signage already in their intended positions. If needed, move display stock outside the shelter while keeping the designated path clear. Check counter reach and floor space against the requirements that apply to the venue.
A single service counter often leaves more maneuvering space than several displays. If a wheelchair cannot turn inside the booth, serve visitors from a clear exterior approach. Reconfigure the equipment rather than relying on staff to lift a person or mobility device.
What should I check before using an 8×8 canopy in windy weather?
Check the weather forecast, the canopy’s documented limits, and the required anchoring method before assembly. Inspect every leg, locking joint, fabric attachment, and weight for damage or insecure positioning. Do not infer a safe wind speed from roof dimensions or a claim that the product is heavy-duty. Assign responsibility for taking the shelter down when conditions become unsafe.
Open sidewalls and signage can change how wind acts on the structure. Follow the manufacturer’s instructions for their use instead of improvising extra fabric panels. Stop operations early enough to clear people and equipment before stronger gusts arrive.
A canopy is not a safe shelter during a thunderstorm, even when its roof sheds rain. Have a substantial indoor building or suitable enclosed vehicle identified as an emergency destination. Keep an unobstructed route to that destination throughout the event.
Take down the tent whenever its instructions or changing conditions require it.
What to Remember About an 8×8 Canopy Tent
An 8×8 canopy tent works best for two-seat dining, front-service craft stalls, or single-counter event stations. Those arrangements preserve the limited 64-square-foot roof area for one practical activity. Begin with a measured 96-inch layout, then account for furniture, actual frame clearances, and anchoring. When seating or visitor access becomes cramped, remove equipment or choose a larger canopy.