
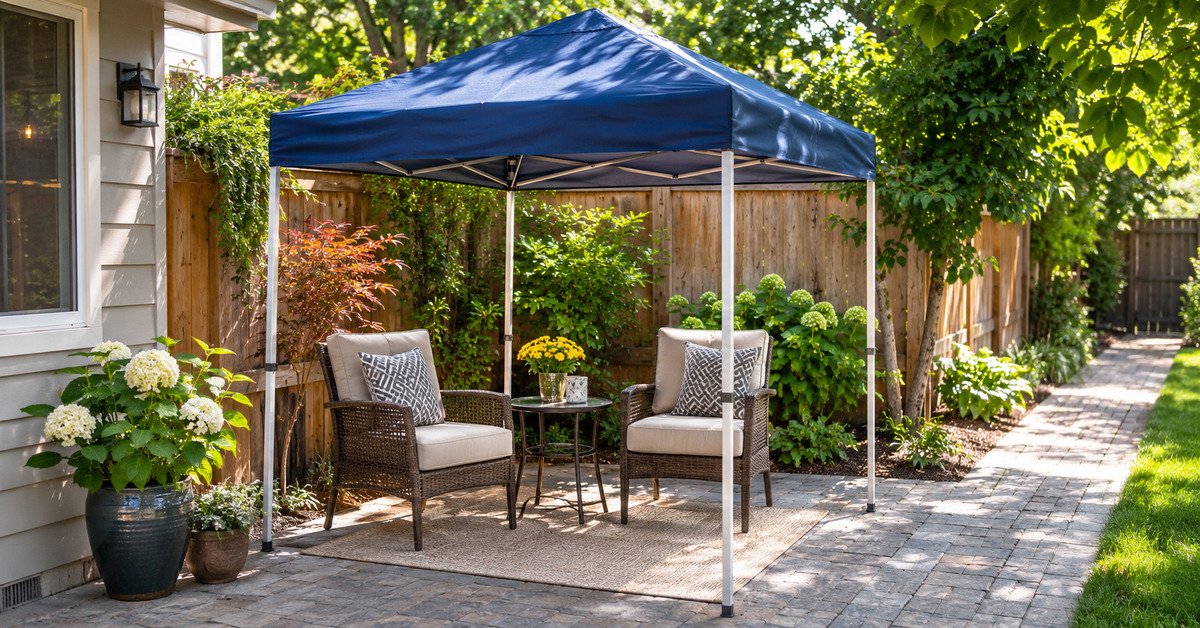
A 6×6 canopy tent suits one person at a compact workstation, a solo vendor, or two patio sitters. With a true six-foot-square roof, it provides 36 square feet of nominal coverage. That footprint becomes cramped around dining tables, customer queues, or equipment needing clear access on several sides. Choose this size for one contained activity, not for hosting a group.
Picture the actual people and furniture, then mark the available space on the ground. If two chairs or a narrow desk block the entrance, the setup already needs more room.
Under low afternoon sun, shade may shift away from the furniture while the frame remains stationary. Anchoring equipment, frame legs, and swinging doors can reduce usable space further. A larger canopy improves movement only when the location also permits safe installation.
The strongest matches are patio couples, solo craft vendors, and staff operating a small check-in station. Families hosting meals, busy sellers, and groups expecting lounge seating should consider larger footprints. The measurements below show when six feet works and when eight or ten feet makes more sense.
Jump to a specific section on this article
Measure Whether a 6×6 Canopy Fits Your Outdoor Space
Usable space after the frame and anchors are installed matters more than the roof label. Tape out a six-foot square, then place the real chairs, work surface, and storage inside it. Next, check the extra leg spread specified for any slant-leg design. Before selecting a spot, compare the canopy size dimensions with the available width around obstacles.
Leave additional space where a person must approach each leg or adjust an anchoring weight. If a door swings into the square, mark its entire arc before deciding on tent placement. Watch for uneven pavers or drainage slopes that could leave the frame unstable.
Measure overhead clearance beneath balconies, branches, awnings, and low electrical lines before opening the canopy. Inspect the full roof peak height as well as the lower perimeter clearance specified for the frame. Temporary structures should never touch utility lines or obstruct building exits.
A compact frame may fit the ground outline while leaving no room for safe anchoring outside it. Plan a clear route from the house or sidewalk to the shaded area. Allow more room when a wheeled cart, stroller, or mobility aid uses that route. A dry run with tape often reveals conflicts that are invisible in a sketch.
Rooftops and balconies also require permission and assessment of structural and wind conditions. A small canopy must not be secured to a railing without an approved anchoring method. Choose the location only after both footprint and anchoring requirements are satisfied.
Shade a Two-Chair Patio Setup With a 6×6 Canopy
For two people reading or talking, compact chairs and a small side table make a sensible arrangement. Both people should be able to stand and leave without moving the other person’s seat. Wide loungers and dining armchairs consume turning space that a compact arrangement needs. Trace the chairs’ pulled-back positions on the patio before raising the tent.
Place the small table between chairs instead of beside a busy walkway. Keep hot drink surfaces away from elbows and from the tent’s moving fabric. Position each chair so guests can stand without pushing into a support leg.
Morning sunlight often enters from one side even when the overhead roof blocks direct midday rays. Use the actual patio orientation when deciding which edge should face the sun. A removable side shade can help with a low sun angle when its manufacturer permits that configuration. Extra panels also increase wind exposure, so their attachment and anchoring instructions matter.
If chairs are used for reading, verify the light remains adequate when sunlight shifts. A cushion, footrest, or plant can quickly reduce the remaining clearance. Keep access open toward the safest route back indoors.
Two seated adults are usually a more practical goal than a complete outdoor dining arrangement. For frequent entertaining, a larger roof allows more freedom around the furniture.
Use a 6×6 Canopy for a Small Craft Market Booth
A solo craft seller with flat, portable inventory can make good use of a 6×6 canopy. It works poorly when multiple shoppers must enter or browse shelves along two sides. Confirm the market’s minimum pitch size and anchoring rules before assuming a smaller booth will qualify.
Many markets standardize booth allocations, and a smaller canopy may not satisfy their rules. For product rows, the 10×10 canopy market footprint offers useful context for larger venue allocations. Ask whether the organizer measures the roof, the legs, or the complete anchored area. Verify restrictions on weights, guy lines, signage, and items placed beyond the assigned boundary.
Use shallow shelves or a narrow table to keep the customer-facing edge uncluttered. Place heavier merchandise low to reduce tipping risks around passing shoppers. Keep the cashier’s access clear instead of standing behind an oversized display.
A single display wall can create a useful backdrop without enclosing every side. Check whether the wall is rated and attached for the specific frame. Put high-demand items near the front without allowing products to spill into public paths. A secure storage box beneath the table helps recover valuable floor area.
One seller with light stock is easier to accommodate than two sellers with large inventory. Any queue or product demonstration should take place only in a permitted adjacent area.
Choose a larger market allocation when visitor circulation becomes the main purpose of the booth.
Set Up a 6×6 Canopy Event Registration Station
One attendant can operate a short check-in desk beneath a six-foot roof. A second attendant needs a narrow desk and equipment arranged away from the entrance. Direct the waiting line outside the canopy without obstructing the main pedestrian route. If guests must complete forms inside, or queues approach from several directions, use a larger station.
Place the waiting line outside the canopy where the event plan allows it. A clear sign should identify registration before guests reach the table. Queue barriers must not create an obstacle for wheelchairs or emergency access.
If electricity is needed, route approved cables away from feet and moving chair legs. Consider battery-powered equipment to avoid a loose extension cord crossing the entry. Keep electronics away from rainfall blowing through the open sides.
Position the station where staff can see approaching people and nearby exits. A visible information board can reduce repeated questions at the desk. Keep personal belongings beneath the work surface without blocking leg adjustment points.
Two attendants may fit only when the desk is narrow and duties are simple. Large bags, badge printers, and storage bins can make the same footprint cramped.
Move to a larger canopy when guests need to step inside for extended registration.
Create a Shaded Work Area Under a 6×6 Canopy
A 6×6 canopy suits one gardener at a potting bench or someone sorting small outdoor supplies. It is less suitable for long workpieces, dust-producing power tools, or tasks requiring movement on several sides. Choose a ventilated worksite and keep moving equipment away from the fabric and frame.
Place the work surface along one edge to leave a clear standing lane. Reserve the opposite side for a bucket, supplies, or a second worker when space permits. For cutting or drilling, follow equipment instructions for stable support and adequate ventilation. Keep combustible materials away from heat sources and never treat the canopy as a workshop fire enclosure.
A narrow portable bench can work better than a full-width folding table. Mark the movement needed to lift trays or swing a cabinet door. Stand where a tool cannot strike the canopy poles during normal operation.
For plant work, protect fragile leaves from overheated surfaces and reflected sunlight. If the work produces dust or fumes, move it to a better-ventilated suitable location. A shelter roof does not replace electrical protection or weatherproof tool storage. Stop work when wind begins moving the frame or loose materials.
Set a clear boundary so visitors do not approach sharp tools or cords. Use a separate covered container for small parts instead of leaving them underfoot. A six-foot canopy suits one focused task more naturally than several simultaneous workstations.
Plan Furniture and Entry Clearance in a 6×6 Canopy
A layout that appears generous when empty may fail once someone pulls out a chair. Draw every seat in both its occupied and pulled-back positions before setting up. The main entrance must stay clear even when everybody is seated.
Use the actual outside dimensions of a proposed table, including handles or projecting legs. Allow for chairs pulled backward, not only chairs tucked neatly beneath the table. Keep bags and coolers away from the opening where people enter. A small seating layout should never make a support leg part of the walking route.
Short furniture can make the center feel open while leaving the edges accessible. Before adding an enclosure, the difference between canopies and tents helps clarify why open sides matter. Even one sidewall changes how people reach the seating area.
Place heavier supplies on stable ground where they cannot be kicked by someone standing. If children use the space, avoid projecting corners at head height. Test the layout with the actual number of intended occupants. Repeat the test while one person enters and another remains seated.
Keep at least one practical departure route available at every moment. A usable path matters more than maximizing how many objects fit under the roof. For crowded layouts, choosing an eight-foot canopy often improves circulation substantially.
Check 6×6 Canopy Leg Height and Headroom
Do not confuse the advertised peak height with usable clearance along the roof edge. Tall adults encounter the valance and frame before reaching the higher center. A display sign or raised workpiece may strike a crossbar even when the peak seems adequate. Check the exact model’s lowest side clearance and leg settings on level ground.
Measure the tallest user’s standing reach before positioning hanging signs or accessories.
Keep fabric and frame braces above ordinary movements at the entrance.
Adjust legs evenly according to the instructions rather than using unequal settings to compensate for sloping ground. Check the roof tension and locking mechanisms after every height change. If the required headroom is unavailable, select a different canopy design.
Keep 6×6 Canopy Entrances Clear of Furniture
Every six-foot setup needs a practical route into and out of the shade. Put the table against an edge rather than cutting the floor in half. Keep the opening clear of chair legs, bags, and anchor parts. If visitors must sidestep the frame to enter, remove furniture or choose a wider canopy.
Allow guests to leave without stepping around a second person’s seated knees. Secure loose floor coverings so their edges cannot catch shoes or mobility aids. Keep extension leads and bag straps away from the entrance.
For a craft booth, shift impulse items onto a narrow front display rather than across the doorway. For a patio, place one side table between chairs instead of beside the entrance. For registration, keep paperwork trays on the table instead of on a floor bin. These small choices preserve the limited turning space.
Check the entrance with the canopy fully weighted or staked. If an anchor extends into the path, redesign the layout rather than leaving a trip hazard. A clear opening remains essential even during a brief event.
Secure a 6×6 Canopy in Confined Outdoor Spaces
Even a compact roof can shift or lift when wind catches the fabric. Follow anchoring requirements for the exact frame and the ground surface beneath it. A narrow balcony or paved path may offer no safe location for the required ballast.
On grass, stakes may be appropriate only where underground utilities and soil conditions permit them. On paving, use a manufacturer-approved ballast system designed for that specific canopy. Do not assume a planter or furniture leg is a secure substitute for a tested anchor. Check that every anchoring point remains accessible after furniture is arranged.
Guy lines may extend beyond the roof boundary and interfere with nearby walkways. Mark those extensions on the ground before committing to a tight location. Cover or reroute exposed trip points where the setup instructions allow.
Wind can lift or shift even a small canopy, especially when walls increase the exposed surface. Inspect all leg locks and the top fabric before guests arrive. Monitor changing weather instead of trusting an unspecified universal wind tolerance. Take the shelter down whenever the manufacturer’s weather limits or site conditions require it.
Balcony rails and vehicle components are not automatically approved anchor points. If there is no safe anchoring arrangement, avoid installing a freestanding canopy there.
Understand the Shade Coverage Limits of a 6×6 Canopy
A true 6×6 roof represents 36 square feet of nominal horizontal coverage. It does not provide 36 square feet of reliable ground shade throughout the day. Low sunshine shifts the shadow sideways, often leaving a chair partly exposed.
Nearby walls, fences, and trees can change the useful shaded zone. Observe the site at the same hours when people plan to sit or work. The position of a fixed table may matter more than the nominal roof width. Move chairs within the safe footprint rather than chasing the shadow outside the anchored area.
Check whether the manufacturer measures six feet across the roof or between outer legs. Slant-leg designs can occupy more ground than their smaller roof dimensions imply. The difference is especially important on a narrow patio or vendor pitch.
Alongside geometric shade, fabric composition and coverage affect sun protection. For added context, consider the canopy tent uses and limitations overview when planning open-sided shelter. A canopy roof does not eliminate reflected sunlight or exposure entering through open sides.
Low-angle sunlight often requires repositioning people rather than adding larger sidewalls. For prolonged afternoon gatherings, a larger canopy may deliver more usable shade.
Assess Rain and Wind Limitations of a 6×6 Canopy
Do not buy a 6×6 canopy expecting to stay dry through wind-driven rain. Its open sides leave seats, tools, and merchandise exposed to blowing water. Fabric water-resistance descriptions vary by model and do not establish storm suitability. For electronics or outdoor work, plan a quick pack-up and a dry indoor alternative.
Water pooling can stress a poorly tensioned roof, especially if its frame is not level. Inspect drainage paths and clear debris according to the product instructions. Do not push trapped water upward while standing beneath a loaded canopy.
Wind resistance varies with the complete frame, anchoring arrangement, accessories, and conditions. Never infer a safe wind speed from a different tent’s advertisement. Solid walls can increase the area exposed to gusts. If the manufacturer provides a weather limit, follow that limit for the exact configuration.
Thunderstorms require leaving the canopy entirely, regardless of its small footprint. During thunderstorms, National Weather Service lightning safety guidance explains why outdoor tents do not offer protection from lightning. Move to a substantial enclosed building or a suitable hard-topped vehicle before the storm arrives.
Remove accessories and close the frame if conditions make continued use unsafe. Dry the fabric fully before prolonged storage to reduce moisture problems. A 6×6 canopy remains a temporary shade structure, not a dependable severe-weather refuge.
Know When a 6×6 Canopy Tent Is Too Small
Skip a 6×6 canopy when dining chairs must surround a table on several sides. Three seated adults can crowd the floor even before adding bags or coolers. Busy market stalls also need more room when buyers must enter and browse. The test is functional: nobody should move furniture just to enter or leave.
An 8×8 roof offers 64 square feet of nominal coverage, compared with 36 for a true 6×6. For larger layouts, the canopy tent buying and sizing guide explains matching shelter dimensions with activities. Size up only after confirming the larger frame and its anchors fit the site.
Some compact models need extra ground clearance because slanted legs spread beyond the roof edges. The VINGLI 6×6 ft Pop Up Canopy Tent with Backpack and 1 Sidewall (White) illustrates why both roof and leg measurements matter. Its partial sidewall also affects how people approach items near the perimeter.
For recurring markets, a larger roof can separate a display area from the customer approach. The CROWN SHADES 10×10 Pop Up Canopy Tent with One Push Setup (Grid White) illustrates that larger configuration. Check the broader ground footprint and packed dimensions before assuming it suits your location.
Choose 6×6 for a solitary potting station, one compact display, or two small chairs. Choose 8×8 when people must walk around a table or reach a second display. Consider 10×10 when a market requires that pitch or customers need browsing room. Every larger frame still needs adequate anchoring space and unobstructed exits.
The right size is the smallest properly anchored canopy that lets everyone use the space without crowding.
Frequently Asked Questions about a 6×6 Canopy Tent
How many people can comfortably fit under a 6×6 canopy tent?
Plan for two seated adults with a compact table when comfort and movement matter. The same roof can briefly cover additional standing people, but furniture and support legs restrict circulation. A true six-foot-square roof covers only 36 square feet in horizontal projection. Do not treat an advertised occupancy claim as a verified seating layout.
Place two chairs inside a marked square and test how far each chair moves backward. Allow an unobstructed exit rather than filling the remaining gap with a cooler. If guests need to walk around a table, the practical seating count falls.
Children, bags, and display supplies also take up usable space. For a short check-in point, one attendant and a desk can work well. For meals or extended socializing with several guests, choose a larger footprint.
Can a 6×6 canopy tent fit on an apartment balcony?
Only install a 6×6 canopy on a balcony when building rules, space, and engineering conditions permit it. Check the full frame and anchor footprint, not merely the nominal roof width. Balconies can experience concentrated wind effects that ground-level patios do not. Never improvise a tie-down to railings or assume furniture will provide adequate ballast. If approved anchoring and clear exits are impossible, use an alternative shade solution.
Is a 6×6 canopy large enough for a farmers market stall?
A 6×6 canopy can serve a small stall only when the market accepts that booth dimension. Many organizers allocate pitches with specific minimum sizes and anchoring rules. Confirm whether merchandise, signage, and guy lines must fit inside the marked space. A narrow table and one attendant make the best use of the available area.
Keep queueing customers outside the frame without blocking neighboring vendors. Plan a dry run using the real display, stock bins, and payment equipment. If shoppers need to enter and browse, a wider stall is usually more practical.
What size folding table fits inside a 6×6 canopy tent?
A narrow four-foot folding table is a sensible starting point for one-person service or small displays. Its precise width and depth should be measured before arranging chairs or product shelves. A six-foot-long table can occupy the entire nominal span along one side. Check the outside table-leg positions so they do not interfere with canopy feet.
Leave usable space behind the table when an attendant will stand there. Allow customers to approach without leaning across a blocked entrance. If the table folds, check the clearance needed for its locking braces.
A smaller table may improve access more than removing another chair. Measure the intended chair pullback distance before deciding the final position. Trial placement on the ground is more reliable than a not-to-scale diagram.
How does a 6×6 canopy compare with an 8×8 canopy tent?
A true 6×6 canopy has 36 square feet of horizontal roof projection. An 8×8 roof has 64 square feet, adding 28 square feet of nominal coverage. That extra area can make furniture placement and entry clearance noticeably easier. The larger frame also needs more clear ground space and suitable anchoring. Compare actual leg spread and packed dimensions because model design affects both.
Choose six feet for one workstation or two compact seats in a constrained location. Choose eight feet when people need to move around a table or display. Neither size should be judged only by a product image without measurements.
Can a 6×6 canopy tent be installed on concrete?
Concrete installation is possible only with ballast approved for the specific frame and site conditions. Ordinary ground stakes cannot be driven into solid paving without specialized permitted arrangements. Select a manufacturer-specified anchoring system before bringing the shelter to the location. Check whether an event organizer imposes additional securing requirements.
Place ballast where it will not interfere with the entrance or public walkways. Inspect the ground for slopes, cracks, and changes in surface level. Do not use loose bricks or improvised heavy objects as an assumed safe substitute.
An open lawn and a paved courtyard may demand different anchoring methods. Solid side panels can change wind loading even on the same frame. If the recommended ballast will not fit, reconsider the location or shelter type.
Never leave the tent unsecured while deciding how to weight it.
Are sidewalls practical for a 6×6 canopy tent?
One compatible sidewall can help screen low sunlight or provide limited visual privacy. More panels reduce open access and can increase wind loading on the frame. The COBIZI 6×6 Pop Up Gazebo Screen Tent with Carry Bag and Ground Stakes (Blue) illustrates a screened layout that requires careful entry planning. Use only panels approved for the exact model, and follow its securing instructions.
Can one person set up and take down a 6×6 canopy?
Some compact frames are designed for solo handling, while others require a second person. Check the assembly instructions for your exact model before attempting setup alone. Screened shelters have different opening and pole sequences from conventional four-leg canopy frames. Do not transfer another manufacturer’s setup promises to your chosen shelter.
Clear the ground and position anchors before unfolding the frame. Keep fingers away from sliding joints and lower the legs before folding. Ask for assistance whenever the frame becomes awkward or unstable.
Will a 6×6 canopy tent fit inside a small car?
Many compact canopy designs can travel in a car, but the packed length controls fit. Measure the manufacturer’s closed-frame dimensions, including the bag and any protruding wheels. Compare those dimensions with the trunk opening rather than only the cargo-floor length. A short packed frame may still be difficult to maneuver through a narrow hatch.
Measure the car with the rear seats in their normal intended position. Consider how ballast, poles, tables, and chairs will occupy the remaining cargo area. Keep heavy equipment restrained so it cannot move during transport.
A wheeled carry bag can simplify movement over firm, smooth ground. Check both the complete package weight and the frame’s weight before lifting. Never assume every 6×6 model has the same packed dimensions.
Is a 6×6 canopy worth buying for occasional backyard use?
A 6×6 canopy is worthwhile when you repeatedly need shade for one compact activity. Two patio chairs, a potting bench, or a small craft display can justify its footprint. Occasional larger gatherings will quickly reveal the limits of this shelter size. If you regularly seat groups or host meals, start by measuring a larger canopy instead.
Consider how often the structure must be carried, opened, anchored, dried, and stored. Check whether a permanent patio feature already provides the needed shade. Temporary setups still require attention to forecast conditions and adequate anchoring.
Choose a model whose actual geometry matches the available ground and overhead clearances. Test the intended furniture arrangement before committing to any accessory walls. If the shelter is needed only rarely, compare the practicality of borrowing or renting one.
Buy the 6×6 size only when its limited footprint genuinely matches how you will use it.
A Few Last Things to Know About a 6×6 Canopy Tent
Choose a 6×6 canopy tent for two compact chairs, one small display, or one outdoor workstation. Pass on this size when diners need room to move or customers must browse inside. Before buying, mark the full frame and anchor footprint, then practice entering and sitting. If furniture crowds the path, choose the next larger size that safely fits your site.