
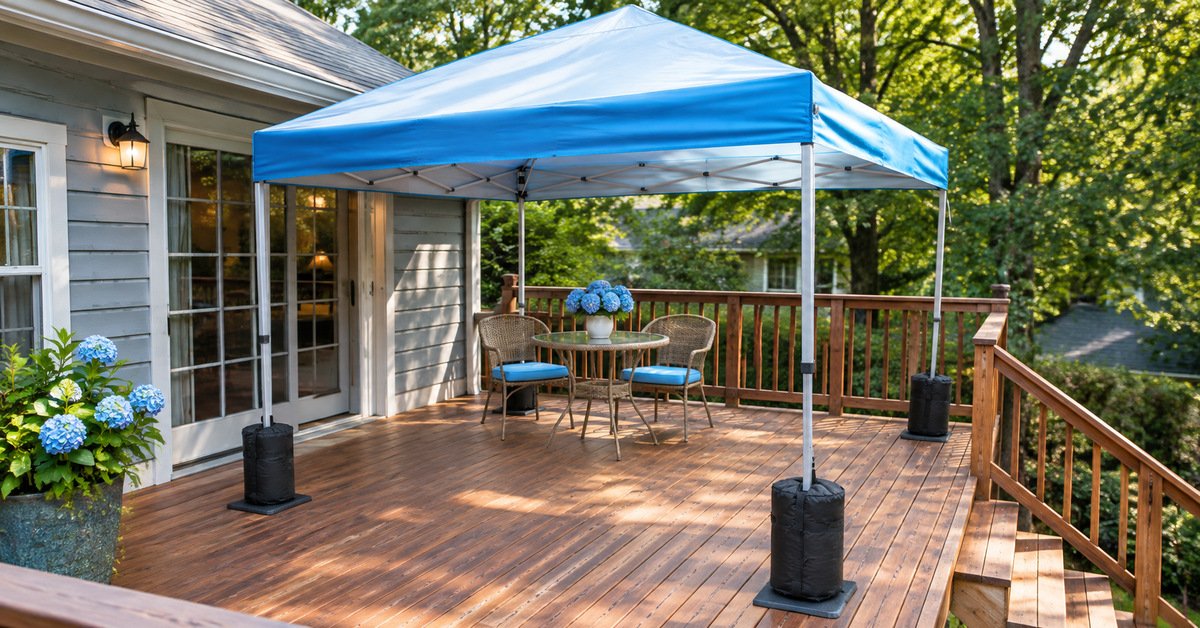
A canopy tent for deck use can provide shade, but the deck must safely support its footprint and securement. Start by checking the deck structure, clear walking paths, and nearby rooflines before choosing a canopy. The most common sizing mistake is measuring only the fabric roof instead of every frame foot. A suitable installation protects the decking surface while keeping exits and stairs unobstructed.
Deck boards are a finished walking surface rather than an automatic anchoring system for a temporary shelter. Ballast, rain runoff, and wind forces therefore need separate attention before anyone sits underneath.
Measure the usable deck rectangle with doors open and chairs pulled back. Check each post, railing, stair landing, and low eave against the canopy manufacturer’s assembled dimensions. Treat a deck with rot, movement, or uncertain capacity as a structural question before adding equipment.
A smaller shelter often works better than a roof that reaches every rail. Removable protection beneath each foot can reduce abrasion, provided the decking maker approves the material. The following checks move from deck capacity and layout to anchoring, weather, and clear decision points.
Jump to a specific section on this article
Assess Deck Load Limits Before Choosing a Canopy Tent
Before adding a canopy, determine whether the deck structure is sound and suitable for the planned people and equipment. Check records for the deck’s design, modifications, and any previous professional inspections. Visible deterioration around joists, posts, connections, or the ledger needs attention before a shelter is installed. A floating deck and an elevated attached deck can have different critical connections.
The American Wood Council explains that its IRC-based deck guidance uses a 40 psf uniformly distributed live load. Read that deck load explanation alongside your local code and the actual structure’s design. That figure does not establish how much concentrated canopy ballast a particular board can safely carry.
People, furniture, containers, and canopy ballast all contribute gravity loads to the occupied deck. Positioning a heavy container above one unsupported board can be worse than spreading approved loads near structural support. A qualified deck professional can evaluate uncertain framing, connections, and load paths.
Wind adds uplift and sideways force that cannot be checked using floor live-load figures alone. A canopy leg beside a railing does not make that railing a suitable anchor. Never rely on deck boards or rail fasteners to resist unknown wind loads. A canopy without a compliant securement method should remain off the deck.
Record the frame weight and planned ballast before reviewing the combined setup. Leave room for occupants to move without collecting everyone around a single overloaded corner. If inspection reveals sagging, loose connections, or rotten wood, repair the deck before reconsidering shade.
Measure a Deck for a Canopy Tent and Furniture
Measure the deck’s clear width and depth at board level rather than relying on advertised dimensions. Record the inside faces of rails, fixed benches, protruding posts, stair openings, and door swings. Plot every canopy leg using the assembled base measurements supplied for the exact frame. Mark the roof edge separately when fabric overhangs the support legs.
Subtract the canopy’s base width from the measured usable deck width before judging fit. With exactly 10 feet of usable width, an eight-foot-wide frame leaves only two feet of combined side clearance. That allowance must accommodate footplates, ballast, rail setbacks, and any walking route.
Open the deck door fully and pull dining chairs back to their occupied positions. A three-foot-wide taped lane is a useful route check, although applicable access requirements must still be confirmed. The canopy size chart and dimensions can help distinguish nominal roof area from the frame’s occupied space. Compare both occupied furniture and every filled ballast container against that lane.
Place an empty box matching each filled ballast bag’s expected footprint at its marked leg. Test the route while carrying a chair or walking alongside another person. If the arrangement forces a sharp detour around a foot or strap, downsize or reposition the canopy.
Finish by measuring overhead obstructions at the same four proposed corners. A level deck footprint means little if an eave crosses the rising canopy frame.
Choose a Canopy Tent Size for a Narrow Deck
An 8-by-10-foot deck provides 80 square feet before furniture and structural obstructions take space. A six-by-six-foot canopy occupies 36 square feet of that plan area, leaving 44 square feet outside its nominal footprint. Those remaining strips are divided around the frame rather than forming one continuous walkway.
On a 10-by-12-foot deck, an eight-by-eight-foot frame covers 64 of the deck’s 120 square feet. Centering that frame leaves one foot on each side and two feet at each end. Those narrow side gaps cannot provide a three-foot planning route, even before ballast is added. A smaller six-foot frame may free a usable aisle when furniture and structural clearances also fit.
On a 12-by-16-foot deck, an eight-by-eight-foot frame leaves four feet of total width beyond its base. Offsetting it toward one side may reserve a wider route between the door and stairs. Confirm that the opposite legs and filled weights still clear the railing.
Use removable tape to draw the canopy base, door swing, and a three-foot route in the same sketch. Set chairs in their occupied positions and leave space to reach every ballast attachment. A ten-foot-square canopy on a 12-foot-wide deck leaves only two feet of combined side margin. If the access route disappears, choose a smaller canopy rather than reducing safe egress.
Also reserve enough room to unfold and lock the frame without leaning over the railing. Make sure the folded package can pass safely through the intended approach.
Choose a size only after its complete footprint, overhead envelope, and required ballast all fit together.
Compare Pop-Up and Fixed-Frame Canopies for Decks
A pop-up canopy is designed for repeated assembly, while a fixed-frame shelter generally stays assembled longer. Understanding the difference between canopies and tents helps identify whether an open-sided temporary roof meets your needs. Pop-up frames still require proper securement and removal when conditions exceed their instructions. Fixed frames may introduce permanent support, attachment, and permit questions.
For a documented comparison, the E-Z UP Ambassador Instant Pop Up Canopy Tent, 10 x 10, Slate White has a straight-leg steel frame. E-Z UP lists a 100-square-foot base and includes a roller bag and ground spike kit. The spikes are unsuitable for finished deck boards, and its ten-foot base cannot fit narrower usable widths.
Portable frames can be folded and stored before severe weather or winter snow accumulates. That advantage disappears when the shelter cannot be unfolded without blocking doors or reaching over rails. Verify the manufacturer’s setup sequence and required number of helpers.
A more permanent canopy may be appropriate when the deck is designed for its structural connections. Seek plans specifying wind resistance, waterproofing at attachments, and loads transferred to framing. Never substitute a temporary pop-up manual for the engineering of a permanent roof.
Consider setup access, anticipated duration, and the available securement method together. The best format is the one whose entire installation can be supported and maintained.
Neither format should be treated as a substitute for a building-approved deck roof.
Check Canopy Tent Height Against Deck Eaves
Measure the underside of nearby eaves and beams from the finished deck surface. Compare those points with the shelter’s tallest frame height and lowest roof-edge height. Pay attention to sloping rooflines that intersect only one side of the proposed canopy.
Manufacturer specifications distinguish peak height, roof-edge clearance, and adjustable leg settings. The E-Z UP Ambassador 10-by-10 lists a maximum 114-inch peak and 78-inch valance clearance. A 78-inch entry clearance does not mean the roof peak will fit beneath a lower eave. Measure the entire roof envelope and allow room for frame movement during setup.
Open the deck door fully and note any projecting hardware or overhead light fixtures. A sliding door may save floor clearance without eliminating roof or threshold conflicts. Keep the fabric away from hot fixtures, vents, and equipment exhaust.
Test the layout with a measured vertical pole or tape reference before unpacking the frame. Check each corner at the highest manufacturer-approved leg setting you might use. Confirm that a roof overhang cannot rub siding or trap water against trim. If the only workable setting removes required headroom, select another shelter arrangement.
Do not force a canopy roof underneath an eave by bending its frame. Leave adequate clearance for movement and water runoff under ordinary use. Inspect the assembly again after any change in deck furniture or roof accessories.
Position Canopy Legs Around Deck Rails and Stairs
Choose leg positions that preserve complete access to every regularly used door and stairway. Railings mark edges, but their posts can intrude into the placement area of a canopy foot. A leg inside a stair landing may make the deck unusable during an emergency.
Place the four feet on stable, level, fully supported areas of decking. Avoid unsupported board ends, loose planks, and visible gaps around damaged fasteners. Keep guy lines and ballast straps out of paths used by children or pets. Recheck clearance with a chair pulled back and a person passing alongside it.
Corner placement can look attractive while moving a ballast container into a narrow passage. Consider shifting the entire shelter inward rather than trimming hardware or removing guard components. No canopy placement should require modifying a protective railing.
Check that each leg can be reached for assembly, adjustment, and inspection. Workers should not lean beyond the guardrail to attach hardware or stretch the canopy fabric. Ensure access to the stair handrail remains continuous and comfortable. Keep the lower stair landing clear of storage and dangling canopy straps.
Inspect the path after the canopy is fully tensioned and all weights are attached. A clear drawing is useful, but the occupied deck is the final spacing test. If a foot or tether projects into an exit route, relocate the canopy.
Leave Clear Routes From Deck Doors to Stairs
Trace the door-to-stair path with the gate open, then tape a three-foot-wide planning lane. The standard 10×10 canopy footprint illustrates why a large frame can consume that lane before ballast is added. This planning width does not replace any applicable egress or accessibility requirement. Keep weighted bags, guy lines, chair legs, and low frame braces outside the marked passage.
A continuous route is more valuable than reaching the maximum shade coverage.
Put every loose cord beyond the walking line or remove the cord entirely.
Test the path while carrying a tray or moving a mobility aid if those uses are expected. Watch for low side braces that would create head or shoulder hazards. Move furniture before adding more fabric or ballast to a crowded corner.
Allow Space for Canopy Feet Near Deck Rails
A deck guard protects occupants and is not automatically rated for canopy wind forces. Keep the foot and its required ballast on the walking surface rather than balancing equipment along a rail. Leave inspection access to the guard posts and their connectors. A frame corner should never obstruct a gate latch or stair handrail.
Check whether each footplate sits flat across sound boards with adequate support underneath. Avoid placing a small foot directly over a widening board crack. Move the leg inward if the protective pad would project beyond the deck edge.
A weighted leg may occupy substantially more space than the metal foot itself. Measure the fully filled ballast container rather than the empty bag. Keep its attachment close to the leg according to the canopy maker’s instructions. Protect the decking from rubbing straps without creating a slippery walking surface.
Railing posts can complicate roof tension and fabric fit near deck corners. Do not cut the canopy or shift poles beyond approved adjustment positions. If the frame cannot fit without touching the guard, choose a smaller footprint.
Anchor a Canopy Tent Without Damaging the Deck
Securement is essential because a fabric roof catches wind even on a calm-looking deck. Confirm the specific canopy manufacturer’s ballast and anchoring requirements for hard surfaces. Never assume that placing one heavy object beside the frame provides an adequate connection.
A removable option is the Eurmax USA Universal Canopy Weight Bags, Black 4-Pack, 150 lb Total Capacity, designed for loose fill. Its listed 150-pound capacity describes the complete four-bag set rather than a single leg weight. Allow for the filled container’s footprint and confirm the tent manufacturer’s ballast instructions independently. Use the canopy buying and sizing guidance when comparing anchoring methods and frame suitability.
A ballast quantity stated for one shelter may not protect another model or wind exposure. Elevated decks can experience gusts that differ from conditions at ground level. Follow the more restrictive requirements of the canopy manual and the site conditions.
Do not screw through decking or attach lines to guardrails without a verified structural detail. Drilling can admit moisture, compromise waterproofing, and affect individual deck-board warranties. If approved structural anchors are necessary, have their loads and attachment points evaluated. Put the canopy away when its required securement cannot be provided.
Inspect all connections before occupancy and after any accidental frame movement. Dismantle the shelter whenever wind or weather approaches the manufacturer’s removal conditions.
Protect Wood and Composite Decking From Canopy Feet
Canopy feet can scratch coatings or concentrate contact pressure on individual deck boards. Check whether the decking manufacturer permits protective pads beneath outdoor equipment. Use a material that stays stable without trapping moisture or staining the surface.
Trex warns that rubber-backed mats can sometimes discolor or lighten its composite deck surfaces. That material-specific warning does not apply identically to every wood or composite board. Check your actual decking manufacturer’s care instructions before using rubber pads, vinyl mats, or plastic-coated bags. Lift temporary protection periodically to remove grit and let damp boards dry.
The ABCCANOPY Canopy Weights Sand Bags, Black 4-Pack, 120 lb Total Capacity illustrate ballast that avoids drilling. ABCCANOPY describes its 120-pound configuration as four fillable bags, not one 120-pound leg weight. Capacity is a packaging specification, not proof that the deck or canopy can tolerate combined wind loads.
Lift the frame during repositioning instead of dragging a foot across boards. Remove accumulated leaves and grit from pads after wet weather. Periodically move temporary protection to inspect for discoloration, standing water, or soft wood.
If a pad slips, stains, or traps damp debris, stop using it. Protection should preserve both the decking surface and secure canopy footing.
| Deck or canopy-leg condition | What to check | What to do before setup |
|---|---|---|
| Finished timber boards | Brush off grit and inspect the finish, foot contact area, and board support. | Use only a finish-compatible, non-staining barrier if needed; lift the frame instead of dragging it. |
| Composite or PVC boards | Read the exact decking product’s care guide before selecting any mat or pad. | Avoid unapproved rubber- or plastic-backed material; Trex warns some backings can cause color loss. |
| Loose, cracked, or soft boards | Look for rocking feet, exposed fasteners, decay, and unsupported board ends. | Do not place a loaded leg there until the condition has been repaired and support verified. |
| Filled ballast resting on boards | Check the bag’s contact material, full footprint, and required attachment against manufacturer instructions. | Keep ballast upright, fully supported, and away from walking routes; prevent abrasive contact. |
| Water trapped beneath a pad | Lift the protection after wet weather and inspect for damp debris or blocked drainage gaps. | Clear the gaps, allow the surface to dry, and reposition protection to avoid recurring moisture. |
| Deck rail proposed as an anchor | Confirm whether site-specific structural details explicitly permit the expected canopy forces. | Do not improvise tie-downs or drill decking without an approved structural anchoring plan. |
Direct Canopy Rainwater Away From Deck Boards
Rain that runs off a canopy must reach a safe drainage path. Look at where the roof edges discharge relative to doors, stairs, siding, and deck joints. An overhang that directs water against a threshold can create a leak risk. Avoid placing collection containers where they block the required exit route.
Most open deck boards need their gaps clear so water can drain through. Do not use ballast bags, pads, or stored fabric to seal those gaps. Check whether runoff could wash debris toward a stairway or lower entrance.
Follow the manufacturer’s roof-tension instructions to reduce sagging and pooling. Never push trapped water upward from beneath a loaded fabric roof. Move away and dismantle only when conditions permit safe handling. A frame showing pronounced roof sag should not stay occupied during heavy rain.
Inspect the area after a normal rainfall to identify puddles and persistent damp patches. Water diverted toward the building may require a different canopy position or a separate designed drainage solution. Keep drainage changes compatible with the deck’s waterproofing and underlying structure.
Do not attach improvised gutters that overload the roof edge or obstruct doors. Examine fabric seams and roof tension after storage, because loose material can alter runoff. Reposition the canopy if rain concentrates on vulnerable trim.
Recognize When a Canopy Tent Will Not Fit a Deck
A ten-foot-wide canopy cannot fit a deck with less than ten feet of unobstructed usable width. On an exactly ten-foot-wide deck, even a matching frame leaves no nominal space for side clearances. Rails, ballast, door swings, and stair access can make the installation unsuitable despite a matching roof measurement. Evaluate the full frame and attachments instead of assuming that two identical nominal widths will fit.
Limited deck width may favor a smaller freestanding shade device in an approved location. A permanently mounted structure needs its own framing, fasteners, permits, and weather design. Do not transfer the load assumptions of a portable tent to a fixed roof.
Wind exposure is another practical limit, especially on elevated or exposed decks. The shelter may need to be taken down whenever the manufacturer calls for removal. If dismantling would require unsafe work beyond a railing, select a different shade system.
Compare the site’s portable canopy limitations with the deck’s actual access and anchoring constraints. Consider shade sails or umbrellas only when their mounting requirements can be met safely. Keep grills, heaters, and other ignition sources outside the canopy footprint.
Check every planned installation against the deck owner’s rules and local permit requirements. Photograph the proposed leg positions and document the measurements for any professional review. Replace a compromised plank or connection before evaluating shade equipment again. A smaller, removable installation can be a better solution than an oversized canopy.
Use the deck’s structural condition, unobstructed paths, and verified anchoring method as the final decision test.
Frequently Asked Questions about Canopy Tents for a Deck
Can a canopy tent be used on a second-story deck?
Yes, but only when the elevated deck is sound and can support the intended loads and securement. Verify framing, ledger connections, guardrails, and any previous damage before bringing the shelter upstairs. Wind exposure can be greater above ground level, making the anchoring plan especially important. Ask a qualified professional to assess uncertain deck capacity and structural attachment details.
Never treat a balcony railing as an engineered canopy anchor. Keep all legs and ballast fully on supported decking and away from exit paths. Remove the shelter when wind or the canopy instructions require it.
Carrying an assembled canopy up exterior stairs can be difficult and unsafe. Follow the manufacturer’s assembly sequence at the intended location when space permits. If a proper assembly and removal route is unavailable, choose another shade arrangement.
Will a canopy tent interfere with existing deck drainage?
It can if roof runoff concentrates against doors or ballast blocks drainage gaps. Identify the existing flow path before marking the canopy corners. Keep deck-board gaps free of mats, fabric, and loose debris. Watch for runoff striking lower stairs or a basement entry. Relocate the shelter if ordinary rainfall creates persistent pooling.
Could a canopy tent void a composite decking warranty?
A canopy itself does not automatically void every composite decking warranty. Damage from unapproved fasteners, stained surfaces, or abrasive equipment may fall outside particular coverage terms. Read the warranty for the exact decking product and installation date. Ask its manufacturer whether proposed foot pads and attachments are allowed.
Some composite care instructions specifically warn against certain rubber-backed materials. Photograph the surface before installation and inspect temporary protection regularly. Avoid drilling unless the deck design and applicable warranty requirements permit it.
Should I attach a canopy tent directly to deck railings?
No, ordinary deck railings should not be used as canopy anchors without verified structural design. Guard systems are intended to protect people at the edge of the deck. Wind can impose uplift and sideways loads that the guard connection was never designed to resist. Follow the canopy maker’s hard-surface anchoring method instead.
Rail posts and top rails are often tempting because they sit beside canopy feet. Those locations still need engineering evidence before they carry a new load. Avoid rope arrangements that interfere with gates or handrails.
Suitable freestanding ballast must also be connected to the frame correctly. Its contact area and weight need to be acceptable for the deck. Remove the canopy if approved securement is unavailable.
What wind conditions require removing a canopy from a deck?
Take the canopy down whenever its manual specifies removal for forecast or observed wind. Some products provide limits, while others instruct owners to remove shelters in inclement weather. Check the instructions for the exact model rather than borrowing another brand’s threshold. Gusts and wind direction can differ sharply across exposed decks. Do not wait for the frame to lift or shake before responding.
Check the forecast before setup and continue monitoring changing conditions. Stop using the deck canopy when threatening weather develops. Never attempt to restrain an unstable frame by hand.
Can a canopy tent remain on a deck throughout winter?
Most temporary pop-up canopies should be removed for winter storage unless their specific instructions allow continued installation. Accumulated snow and freezing conditions add loads that ordinary fair-weather use does not establish. Store dry fabric separately from abrasive tools and keep the frame clean. Check the deck for ice damage before setting the shelter up again.
Permanent shelter structures require design for the site’s applicable snow and wind conditions. A fabric roof that sags under precipitation should not remain occupied. Avoid climbing a slippery deck or leaning over rails to clear snow.
Inspect stored hardware for corrosion, missing pins, and damaged joints before reuse. Confirm that all parts still lock and tension as the manufacturer specifies. Replace defective components promptly instead of improvising potentially unsafe repairs.
Keep the winter walking route free of stored canopy parts.
Is it safe to use a barbecue grill beneath a deck canopy?
No, keep charcoal and propane grills outside and away from canopy fabric and nearby structures. The National Fire Protection Association advises placing grills away from homes, railings, and overhead eaves. Hot gases, flames, and grease can ignite fabric or damage protective coatings. Position the cooking area apart from children, pets, and the shaded seating zone.
Can a canopy tent cover a hot tub installed on a deck?
Only consider it after verifying the deck’s hot-tub loads and the shelter’s separate suitability for that environment. A filled hot tub, its occupants, and equipment can place substantial weight on a limited area. Steam and chemicals can also affect canopy materials and nearby electrical components. Keep all required servicing clearances and ventilation openings unobstructed.
Confirm hot-tub electrical clearances with the equipment documentation and a qualified electrician. Do not tie canopy lines to the tub or its deck guard. A purpose-designed spa enclosure may be more appropriate than a temporary pop-up frame.
Do I need permission to install a canopy tent on a shared deck?
Check the building’s rules and obtain written permission before placing a shelter on a shared deck. Property managers may restrict attachments, obstructed exits, wind exposure, or unattended temporary structures. Local authorities can apply additional requirements to roofed or longer-term installations. Never assume a removable frame is automatically exempt from these controls.
Provide the canopy dimensions, proposed ballast placement, and intended setup duration with the request. Explain how residents will retain access to doors and stairs. Ask whether a fire or building review is required.
Keep approved paperwork with the building’s maintenance records. Communicate removal responsibilities to other users before severe weather. If approval is refused, select a compliant alternative away from the shared deck.
How can I prevent mildew beneath a canopy tent on a deck?
Allow airflow beneath the roof and keep the deck surface clean and able to drain. Remove leaves, food spills, and damp fabric that can support fungal growth. Check shaded corners after rain instead of waiting for a strong odor. Avoid trapping moisture beneath large impermeable mats over extended periods.
Clean the roof with the method approved for its fabric and finish. Dry the canopy completely before folding it for storage. Inspect deck-board gaps and nearby siding for persistent moisture.
A shaded surface can stay damp longer than one exposed to direct sun. Adjust furniture and removable pads so wet areas can dry. Repair drainage problems that repeatedly wet the same boards.
Store the shelter dry and uncover damp decking until the source of moisture is corrected.
Ready to Explore Canopy Tents for a Deck?
Start by drawing the full leg footprint, roof height, door swings, and a clear route to the stairs. Compare the resulting layout with your deck structure, the manufacturer’s securement instructions, and the filled ballast footprint. Protect boards only with materials accepted by their maker, and keep drainage gaps clear. Choose a smaller canopy or independently designed shade solution whenever those checks reveal a conflict.