
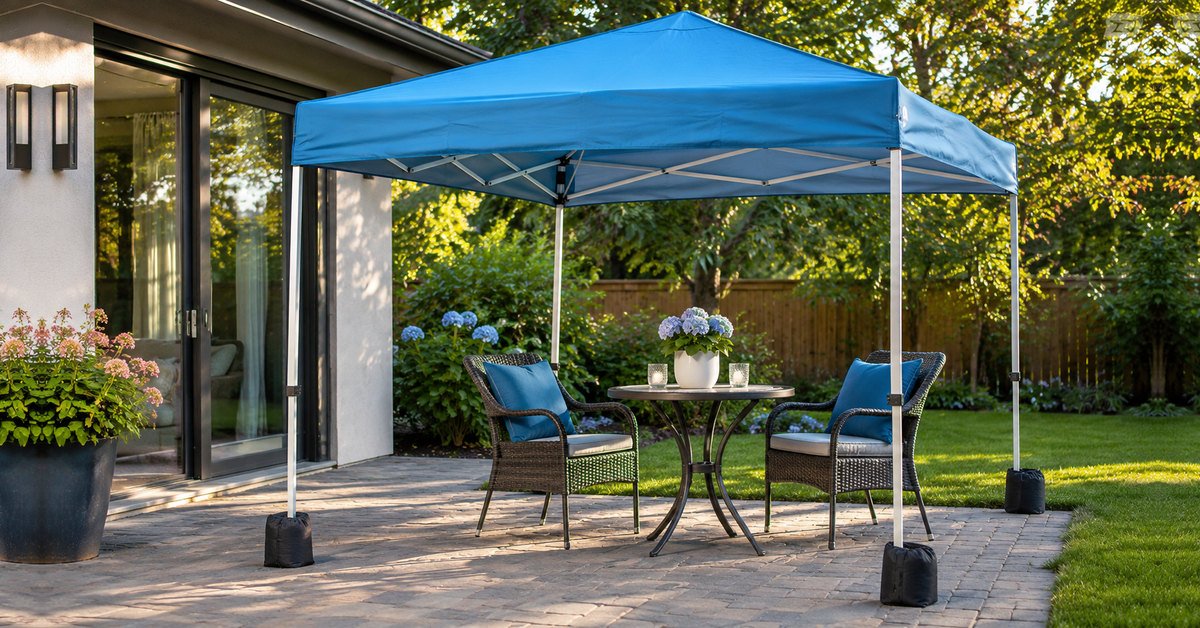
A patio canopy tent turns an exposed seating area into temporary shade without requiring a permanent roof. Its roof and support legs create shelter above furniture while leaving most sides open. A useful choice starts with the patio’s measured clear width, required walking route, and furniture arrangement. A tent that fits the patio boundary can still obstruct doors or sit dangerously on uneven paving.
First reserve your doorway and walking space, then measure the rectangle where all four canopy feet can stand. Add weight footprints, chair pullback, and eave height before deciding between 6×6, 8×8, and 10×10 canopy sizes.
Concrete, pavers, tile, and timber decking create different challenges for keeping a temporary canopy stable. Sun direction and drainage also influence where the roof will provide useful shade. A workable layout keeps doors usable, drainage channels open, and enough room for prompt takedown.
This guide explains the construction choices, clearances, surface protection, and practical installation checks for patio canopies. It also distinguishes planning calculations from specifications that must come from the chosen manufacturer’s instructions. By the end, you should be able to reject an unsuitable canopy size before ordering incompatible hardware.
Jump to a specific section on this article
What Defines a Patio Canopy Tent and Its Main Uses
A patio canopy is a fabric-covered frame positioned over a paved or decked outdoor living area. Unlike a wall-mounted awning, a typical portable canopy stands on four legs without permanent building attachment. The roof offers direct overhead shade while allowing people to enter from several directions. Unlike a fixed patio roof, a collapsible canopy can be removed between uses.
A compact installation may shelter a bistro set, potting table, or outdoor preparation station. Larger layouts can cover conversation seating while leaving circulation space around furniture. The primary use determines whether open sides, adjustable legs, or removable walls matter most.
An open structure generally provides better cross ventilation than a fully enclosed fabric shelter. However, sideways sunlight and wind-driven rain can still reach occupants beneath the roof. Before buying, consider how an open canopy tent functions when exposed to changing conditions.
Patio canopies differ from attached awnings because their legs stand independently on the ground. Pop-up frames expand as connected trusses, while some larger structures require assembling separate poles. Both need anchoring suited to the support surface and the manufacturer’s installation directions. A roof alone does not make the structure safe for unattended or overnight use.
Choose a temporary canopy when flexible placement and seasonal removal are important priorities. Consider a professionally designed permanent shade structure if daily year-round coverage is essential. Local property restrictions and the available anchoring method may determine which arrangement is appropriate.
Measure Patio Space Before Choosing a Canopy Tent
Measure the clear usable width and depth at the exact location where the legs could stand. Include protruding planters, stair edges, railings, walls, drain covers, and furniture that cannot move. Subtract space already occupied by fixed planters, thresholds, and the route guests need between doors and seats. Take measurements at the ground, where canopy feet and weight systems actually occupy space.
Nominal roof size does not always equal the space needed around the completed structure. Feet, guy lines, and anchoring weights may extend beyond the square described by the roof. Compare dimensions using a canopy size reference before marking the intended footprint on the paving.
Mark prospective leg locations using removable tape or small objects that will not damage surfaces. Place chairs inside the marked area and pull each one out to simulate normal movement. Open the patio door fully and walk between seating, steps, and the house. If anyone must squeeze sideways, the layout needs another position or a smaller canopy.
On a 12-by-14-foot patio, reserving a three-foot path along one side leaves nine feet for the canopy. An 8×8 roof then fits nominally, while a 10×10 roof would overlap that protected walking path. The smaller roof still needs separate clearance for its feet and weights, so check the actual model dimensions.
On an eight-foot-wide patio, even an eight-foot roof leaves no nominal side clearance for ballast. A six-foot option creates two feet of total installation width, though doorway and weight dimensions still govern.
Match Patio Canopy Tent Size to Furniture and Seating
For a 30-inch round table, two opposite 24-inch chair-pullback allowances produce a 78-inch working width. That example exceeds a six-foot roof before adding any surrounding walking route. Measure your chairs directly because their actual travel and seating positions may differ.
An 8×8 roof spans 96 inches, leaving nine inches on either side of that centered 78-inch layout. Those nine inches do not provide a walkway or automatically fit leg weights. A 10×10 roof adds 24 inches overall, yet still needs a separate route around occupied seats. Use these numbers as planning arithmetic rather than measured capacities of a particular canopy.
A 10×10 canopy gives a nominal roof footprint of 100 square feet before accounting for posts. A 6×6 roof spans 36 square feet, which may suit one compact bistro grouping without a pass-through lane. When assessing patio seating, the 10×10 canopy footprint is a useful starting point rather than a guest-capacity promise.
A two-seat loveseat and table may fit under an 8×8 roof when the legs avoid seating positions. Two opposing sofas usually need more room once their depths and occupied walking clearances are measured. Position the main walkway outside the canopy corners instead of weaving between occupied chairs. At low sun angles, shift seating inward rather than assuming every square foot stays shaded.
For dining, test the full pull-back distance of every chair before committing to a size. A smaller setup with clear circulation can feel more comfortable than a packed larger shelter.
Choose the smallest canopy that accommodates the measured furniture arrangement and safe access.
Compare Pop-Up and Fixed-Frame Patio Canopy Styles
Pop-up patio canopies use linked folding frames that expand into a usable shelter. They are practical when the patio alternates between open space and occasional covered seating. Assembled-pole designs involve more individual components and usually take longer to erect. Neither style should be assumed suitable for permanent exposure without explicit manufacturer approval.
A central locking hub can reduce the number of separate locking steps during setup. For instance, the CROWN SHADES RM100H 10×10 Grid Gray Pop-Up Canopy uses the manufacturer’s CenterLOK folding-frame mechanism. The RM100H Grid Gray listing specifies a 120-inch square footprint and 112-inch overall height at its listed configuration.
Frame layout affects how people move around the shaded patio. Straight legs place the support points near the roof corners, helping you map furniture accurately. Slanted legs can extend outside the roof perimeter and consume additional usable paving.
Folding joints should be checked for damage, sticking, and correct engagement before every use. A multi-piece frame also needs each connector installed according to its assembly instructions. If enclosure style matters, the canopy versus tent differences help explain airflow and protection limitations.
The RM100H Grid Gray product description lists a roughly 45-inch packed length for its STO-N-GO cover. Check that storage doors, corners, and vehicle openings accommodate that length without forcing joints.
For changing patio layouts, straightforward assembly and reliable takedown often matter more than extra accessories.
Check Patio Canopy Height Against Doors and Eaves
Roof width is only one part of the installation clearance calculation. Measure the lowest nearby eave, wall projection, tree branch, and overhead light fitting. For the cited RM100H, a listed 112-inch overall height does not establish clearance beneath its side valance.
Check both the canopy’s advertised peak height and its documented valance or eave clearance. The lowest rigid bar may sit well below the top of the roof. Record measurements at each available leg-height setting rather than assuming maximum extension is usable. Any uneven patio surface can also change the effective distance between roof and building.
Keep the canopy separated from guttering, roof edges, and vulnerable exterior fixtures. Normal movement under fabric tension must not cause the frame to rub against the house. Leave adequate space for safe assembly and disassembly without trapping equipment beneath the eaves.
For a door projecting 32 inches into the patio, keep that full swing rectangle free of legs and weights. Sliding doors still need a clear access route even though their panels remain within the frame. Plan the passage from inside the home to outdoor seating, not just the threshold. Relocate the canopy if a leg or tie-down would obstruct any necessary exit.
Low hanging branches can scrape fabric and interfere with the roof during gusts. Seasonal growth may change clearances after the first installation. Recheck surrounding obstacles whenever the canopy is moved or extended to another height.
Position a Patio Canopy Tent for Effective Sun Shade
A roof’s ground footprint does not describe where its shadow will fall throughout the day. Sunlight reaching the patio from a low angle can pass beneath open canopy edges. Observe the space during the hours when shade is actually needed.
Mark the chair shadow line at your usual use times, such as 3 PM and 5 PM. If afternoon shadows miss the seats, reposition the furniture within the safely anchored footprint. Moving the roof a short distance may protect seating better than increasing nominal canopy size. However, every adjustment must preserve the approved anchoring position and clear exits.
Canopy fabric specifications sometimes describe ultraviolet protection using UPF values or manufacturer claims. Those figures do not tell you how far afternoon shade extends beyond the roof. Consider the roof pitch, edge height, sun direction, and nearby reflective surfaces together.
An open side facing direct low sunlight will allow glare to reach occupants. A compatible removable sidewall may block some of that glare but will also affect airflow. Check the manufacturer’s approved wall configuration because adding panels changes wind exposure. For strong wind or thunderstorms, remove the structure according to its safety instructions.
Use the most predictable seating hours to set the canopy’s orientation. Keep shaded furniture outside the leg paths needed for access and takedown. Reassess placement as the seasons change because solar angles shift during the year.
Keep Patio Canopy Legs Clear of Door Swings
Place a chair or tape marker at each planned leg position before opening the frame. Swing every hinged patio door to its maximum normal opening angle. Then check screen doors, pet gates, and storage doors that might open into the same area. Leave clear walking space between each leg and the actual doorway threshold.
Do not treat a door’s narrow opening arc as unused patio floor space.
Move the canopy rather than limiting the opening of a required exit.
A route that looks wide when empty may become cramped after seating is occupied. Guests carrying trays or mobility equipment need a dependable passage without stepping over weights. Verify the path again after all anchoring hardware has been installed.
Adjust Patio Canopy Placement for Afternoon Sun
Late-day sunlight often reaches farther beneath an open-sided roof than midday sunlight. Check where the sun actually enters relative to the patio’s orientation. Position the seating group toward the side that retains useful cover during the intended hours. Keep any repositioned canopy entirely within a stable and anchorable installation zone.
An exposed western edge often needs more afternoon shade than the roof center initially suggests. Low fences and reflected light can alter glare even while a roof casts shade. Check the seating area after the sun drops below nearby eaves and branches.
For an adjustable-height model, test whether a lower permitted setting improves coverage without blocking movement. The manufacturer’s minimum clearances and setup directions still control permissible height adjustments. A removable sidewall can sometimes protect one exposed edge while remaining open elsewhere. Do not attach improvised fabric panels that exceed the frame’s documented configuration.
Shade requirements may also change for meals, reading, or screen use. Try the proposed layout at the same time of day as the planned activity. Repeat the assessment during another season if the canopy will be used regularly.
Secure Patio Canopy Tents on Concrete and Pavers
Hard patio surfaces usually prevent the use of ordinary ground stakes directly beneath the canopy. Each leg therefore needs an anchoring method approved for that particular frame and site. A freestanding roof without suitable restraint can move even when its feet appear flat.
Check whether the manufacturer allows leg weights, tie-down anchors, or a specific fixed-base system. Each U0040 plate is listed about nine inches square, so include its floor space in your layout. The US Weight U0040 Tailgater 40-Pound Canopy Weight Set of Four uses interlocking pieces for compatible poles up to 1.25 inches wide. The four-plate set weighs 40 pounds altogether, which alone cannot establish any canopy’s safe wind limit.
Pavers need stable bedding that will not rock or shift under each concentrated load. Avoid placing the feet on loose edge stones, cracked slabs, or unsupported covers. If the approved anchoring method requires drilling, obtain property permission and qualified installation advice.
Fit each weight or attachment exactly as its instructions describe before raising the shelter fully. Keep ropes away from walkways and protect contact points where components might abrade nearby finishes. Never use an improvised tie to a movable chair, railing, or unverified fixture. When weather approaches the model’s restrictions, lower and remove the canopy rather than adding arbitrary ballast.
Inspect the base after movement, rain, and changes in patio use. No single weight quantity can replace the selected canopy’s documented anchoring and weather limits.
Protect Decking and Tiles Beneath Patio Canopy Feet
Decorative patio surfaces can scratch, stain, or crack where canopy feet carry concentrated loads. Wood decking also needs attention to gaps, fasteners, and the boards supporting each leg. Inspect the material and its condition before setting down heavy equipment.
Clean grit from canopy feet and the surface before placing protective pads. Choose pads that will not slip, trap damaging moisture, or react with the finish. Check any protective layer against the manufacturer’s stability requirements and the deck supplier’s care advice. Avoid stacking loose mats because they can create unstable bearing points.
For tiled patios, position loads on sound tiles rather than loose sections with cracked grout or hollow spots. For timber decking, check board condition and structural support wherever legs and weights will stand. The structure must support combined loads from canopy equipment, occupied furniture, and people using the patio.
Move weights carefully rather than dragging them across coated decking or polished stone. Remove trapped leaves and standing water from beneath the feet after use. Temporary protection should make the contact area safer without compromising the anchoring arrangement.
Never attach a canopy to a deck railing without confirmation that the structure supports that load. If the deck condition is uncertain, obtain a qualified assessment before setting up.
Account for Patio Slopes and Rainwater Drainage
Most patios slope slightly so surface water can leave the building and reach a drain. That grade can make canopy legs sit at different effective heights. A level-looking roof does not prove the individual feet have secure, even contact. Check every leg position for rocking before extending the frame.
A patio falling one inch across eight feet changes the relative elevation of opposite leg positions. Do not correct that height difference with loose blocks that could slide or damage a tile. Choose a frame with an approved adjustment range or relocate to a suitable level area.
Locate drains, downspouts, and natural runoff paths before placing feet or ballast. Keep weights from blocking the water routes needed during a storm. Inspect the roof pitch and tension because sagging fabric can collect water. Manufacturer descriptions such as water-resistant do not establish a safe rainfall or pooling threshold.
Rain driven from the side can wet chairs even when the canopy roof sheds water. Water may also accumulate beside pavers when a weight interrupts the usual channel. Move vulnerable furniture away from drainage trouble spots before weather arrives.
A canopy should never direct runoff toward a doorway or building opening. If the patio pools water, solve the drainage issue separately from the canopy installation. Remove the shelter during storms as directed instead of using its roof as permanent drainage equipment.
Choose Patio Canopy Features for Weather and Storage
Weather limits, transport weight, and storage dimensions deserve as much attention as the roof color. Check model instructions for restrictions involving wind, rain, snow, and unattended use. A vented roof or water-resistant textile does not authorize use during severe weather. Plan where the complete frame can be lowered safely when conditions change.
A wheeled bag helps only if the packed canopy can pass through the gate and storage doorway. The Eurmax USA Basic 10×10 White Pop-Up Canopy with Roller Bag and Four Sandbags illustrates a portable packaged arrangement. Its four supplied sandbags need suitable filling and correct attachment before serving their intended anchoring purpose.
Choose replacement-part availability and documented setup instructions over unsupported durability superlatives. Check the actual carrying length against gates, steps, and storage cupboard dimensions. A damp packed canopy needs drying before being returned to closed storage.
Separate three different fabric claims when comparing a canopy for patio use. Water resistance concerns rain penetration, while UPF describes how much ultraviolet radiation passes through fabric. Flame-resistance labeling addresses a specified test and does not authorize cooking beneath the roof.
Before storing the roof, brush off grit and inspect stitching, joints, and the underside coating. Dry the fabric on both sides so moisture does not remain trapped in folded seams. Store model-specific fasteners and ballast covers together to avoid mixing incompatible accessories later. For broader buying decisions, review canopy frame and fabric choices alongside the patio’s measured constraints.
Choose a canopy only after its leg positions, stored length, approved weights, and eave clearance pass your measurements.
Frequently Asked Questions about Patio Canopy Tents
Can a patio canopy tent be installed on a small balcony?
A small balcony can accommodate a canopy only when usable space, building rules, and anchoring all permit it. Measure the entire leg footprint while keeping doors and emergency access unobstructed. Elevated balconies can experience strong, turbulent wind around walls and railings. Do not assume an ordinary ground-level canopy is suitable for that exposure.
Balcony railings are not substitute anchors unless a qualified design explicitly allows the connection. Avoid placing heavy weights on a slab without knowing the balcony’s allowable loading. Property management may prohibit freestanding fabric shelters even where the dimensions fit.
A compact freestanding shade option may be more practical than a four-legged pop-up canopy. Check the exact shelter instructions and the property’s written restrictions before installation. If secure anchoring and clear access cannot both be achieved, skip the balcony canopy.
How does a patio canopy tent compare with a retractable awning?
A patio canopy stands on its own legs, while a retractable awning usually attaches to a building. A portable canopy can move around the patio but introduces ground-level feet and ballast. An awning leaves the floor clear yet requires suitable building attachment and installation. Both need operating restrictions for wind, rain, and routine maintenance. Choose based on how often the shade position must change and whether permanent installation is permitted.
Can a patio canopy tent remain outdoors throughout the year?
Most ordinary pop-up canopies are intended for temporary use and should not remain deployed year-round. Continuous ultraviolet exposure, moisture, debris, and repeated wind loading can accelerate deterioration. Snow accumulation and severe storms create hazards beyond simple overhead sun shading. Follow the exact model’s instructions for storage and permitted weather conditions.
Use a permanent outdoor structure designed for the location when continuous shelter is essential. Dry the canopy before storing it and inspect joints and fabric at each reuse. Do not equate a fabric’s warranty period with a permitted outdoor installation duration.
Are patio canopy tents safe to use near barbecue grills?
Keep barbecue grills and other open-flame cooking appliances away from patio canopy fabric and frames. Heat, grease, sparks, and combustion gases make cooking beneath a temporary fabric roof hazardous. A flame-resistant fabric label does not make the canopy fireproof or suitable for grilling. Follow the grill’s specified clearance distances and the canopy manufacturer’s warnings.
Place the cooking station in an uncovered, well-ventilated location with unobstructed access. Check surrounding walls, railings, and eaves against the grill’s own safety instructions. Do not move a hot grill under the canopy when sudden rain arrives.
Portable heaters and fire pits present similar clearance and ventilation problems. Keep extension cords, fuel containers, and fabric accessories away from hot equipment. If there is not enough safe separation, relocate the cooking area or omit the canopy.
Can a patio canopy tent accommodate wheelchair access?
Yes, a patio canopy can accommodate wheelchair access when the layout preserves adequate routes and turning room. Plan the path around canopy feet, furniture, and ballast rather than measuring the roof alone. For applicable accessible routes, the U.S. Access Board’s accessible-route standards specify at least 36 inches of continuous clear width. A residential patio may not be legally subject to those standards, but their clear-space principles remain useful. Where turning is needed, plan around a 60-inch circle or the equivalent T-shaped space described in accessibility guidance.
Select a stable, firm, slip-resistant surface with no loose mats beneath wheels. Check that thresholds, door swings, and weight blocks do not interrupt the intended route. Test the completed layout with the actual mobility equipment whenever practical.
Do patio canopy tents require permission in rented properties?
Rental properties may require written permission before placing a freestanding canopy on a patio. Check lease terms, building policies, shared-area rules, and any homeowners association requirements. Temporary setups can still violate restrictions involving appearance, fire access, or exterior fixtures. Drilling into paving or attaching ropes to building features generally warrants explicit approval.
Describe the canopy dimensions, proposed location, anchoring method, and intended duration to the property manager. Ask whether storage rules or removal requirements apply during severe weather. Record the approval conditions before buying accessories that cannot be returned.
Avoid relying on verbal assurances when a written restriction appears in the agreement. Never assume a balcony or shared courtyard allows the same setup as a private patio. If fixed anchors are prohibited, investigate a manufacturer-approved removable arrangement that meets the site’s requirements.
Do not install anything when no permitted anchoring and access arrangement exists.
How can I stop rain blowing beneath patio canopy sidewalls?
Wind-driven rain can enter beneath sidewalls because a temporary canopy is not a sealed room. Use only the sidewall attachments and fasteners approved for the exact canopy model. Position vulnerable furniture farther from the exposed edge and maintain a drainage path below. When wind or rain exceeds the manufacturer’s conditions, take the canopy down rather than sealing it tighter.
What wind conditions require taking down a patio canopy tent?
Take down a patio canopy whenever the manufacturer requires removal or site conditions make it unstable. Different frames, roof shapes, sidewalls, and anchoring arrangements cannot share one reliable wind threshold. Rattling joints, lifting feet, shifting weights, and visibly distorted fabric are immediate warning signs. Thunderstorms demand removal and appropriate shelter indoors before hazardous weather reaches the patio.
Check forecasts ahead of setup and allow time for a controlled takedown. Do not stand beneath a moving frame to add weights during worsening conditions. Never treat sandbags or heavy steel legs as a substitute for the model’s actual weather limits.
Can I attach outdoor string lights to a patio canopy frame?
Attach string lights only when the canopy manufacturer permits accessories and specifies suitable connection points. Use lights and power supplies rated for the intended outdoor environment. A lightweight decorative string can still snag fabric or obstruct folding joints during takedown. Never exceed the frame’s permitted accessory load or introduce unsupported hanging fixtures.
Route cables away from doors, feet, and wet pathways where people might trip. Use electrical protection and connections appropriate for outdoor exposure and local requirements. Disconnect power before lowering the frame or adjusting attachments.
Avoid running wires through sharp truss edges or tightly around moving parts. Do not leave electrical accessories attached if the storage instructions require their removal. When the frame lacks approved mounting points, choose independent lighting supports instead.
How do I prevent mold on a patio canopy stored during winter?
Prevent mold by cleaning and completely drying the canopy fabric before it enters closed storage. Damp folds and trapped leaves create conditions that allow microbial growth. Choose a dry, ventilated location where the bag is protected from condensation and leaks. Inspect the roof, sidewalls, seams, and storage bag separately before packing.
Remove surface soil using only cleaning methods the fabric manufacturer permits. Allow fabric to air-dry fully on both sides before folding it. Keep the packed frame away from standing water and damp concrete walls.
Recheck storage after unusually humid weather or evidence of a leak. If mildew appears, follow the fabric-care instructions instead of applying unapproved harsh chemicals. Inspect seams and coatings for damage before returning the canopy to outdoor use.
A thoroughly dry, clean canopy stores more safely than one packed immediately after rain.
Ready to Explore Patio Canopy Tents?
A patio canopy tent provides removable shade, but its advertised roof size alone cannot establish a practical patio fit. For a 12-by-14-foot patio with a three-foot walkway, an 8×8 footprint may fit where a 10×10 would not. Validate that choice against leg weights, door swings, eave height, drainage, and model-specific weather restrictions. Tape out the full installed footprint and test occupied chairs before selecting or setting up the canopy.